3. Spaceship
In this lesson we will learn
- how Pygame handles 2D graphics and coordinates
- how to plan with an input → process → output (IPO) table
- how to create a RoomObject and add it to a Room
- how to move a RoomObject when the player presses keys
Terminology
- avatar – the character or object in a game that the player controls.
- pixel – one of the millions of tiny dots that make up a computer screen.
- coordinate – a pair of values
(x, y)that gives a position on the screen, with x for the horizontal position and y for the vertical position. - origin – the coordinate used as an object's position, which for objects with sprites is the top-left corner.
- IPO table – short for Input Process Output table, a planning tool that sets out the output we want, the input that triggers it and the process that gets from one to the other.
Every game needs a player avatar, and in our game it's a spaceship. In this lesson we'll create the spaceship and make it move up and down the screen when the player presses keys.
Pygame graphics
Now that we're working with sprites, we need to look a bit deeper at how graphics work in GameFrame. GameFrame is built on Pygame, so that means understanding how Pygame handles graphics.
Graphics refresher
Computer screens are made up of millions of tiny dots called pixels. Each pixel can be more than 16 million colours.
Each pixel has a coordinate made up of its x value (horizontal position) and its y value (vertical position), written as (x, y).
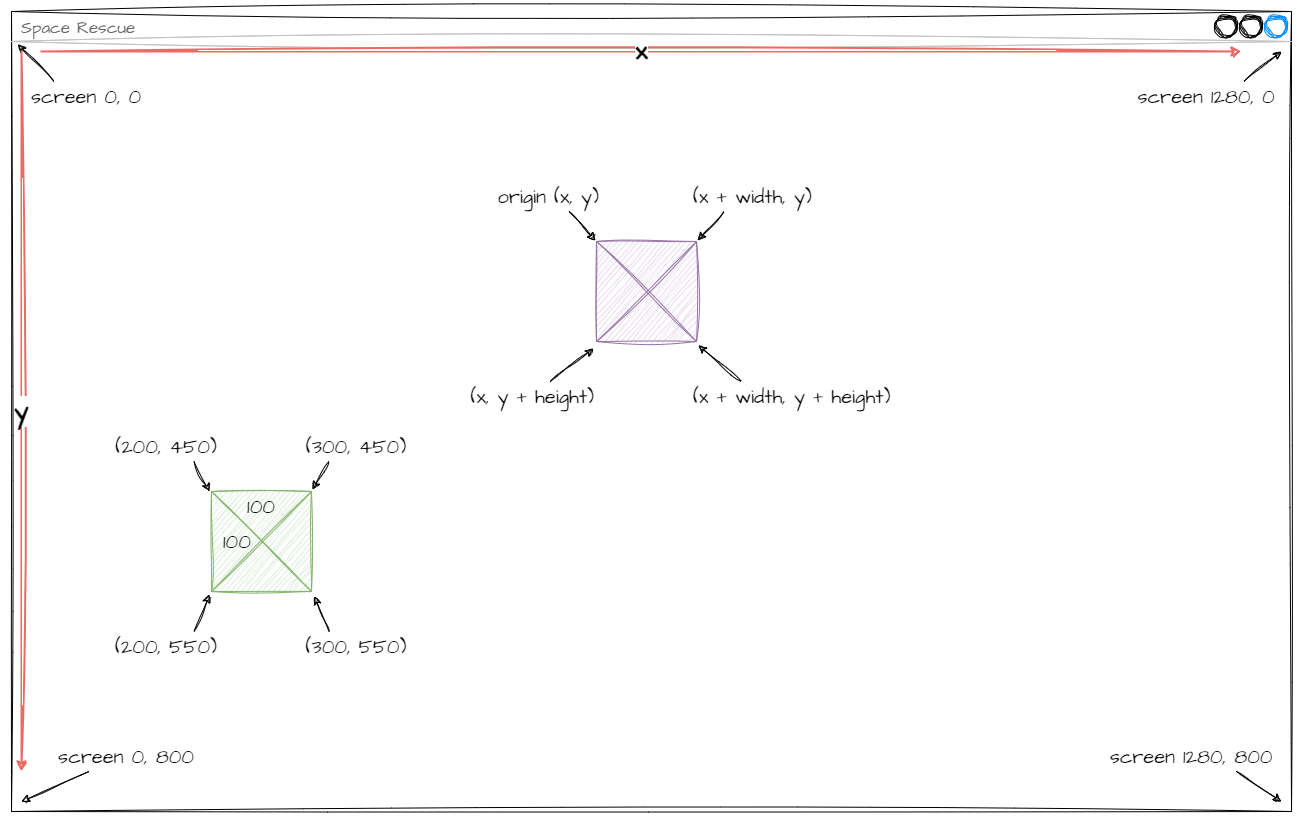
We'll use the image below to explore graphics in Pygame.
The screen
Pygame follows the common convention of putting (0, 0) in the top-left corner of the screen. The x value increases as we move right, and the y value increases as we move down. That means the largest coordinate is in the bottom-right corner, which on our screen is (1280, 800). The edges of the screen are:
| Value | Range |
|---|---|
| x | from 0 to 1280 |
| y | from 0 to 800 |
Objects
Every object on the screen has three values:
- its coordinates
(x, y) - its width in pixels
- its height in pixels
An object bigger than one pixel covers lots of coordinates, so each object has an origin, and that's its coordinate. For objects with sprites, the origin is the top-left corner.
Using these three values, we can work out the corners of the object. Check the purple object in the diagram.
| Corner | Calculation |
|---|---|
| top-left (origin) | (x, y) |
| top-right | (x + width, y) |
| bottom-left | (x, y + height) |
| bottom-right | (x + width, y + height) |
Let's try that with the green object. Its origin is (200, 450), its width is 100 and its height is 100.
| Corner | Calculation | Value |
|---|---|---|
| top-left (origin) | (x, y) |
(200, 450) |
| top-right | (x + width, y) |
(300, 450) |
| bottom-left | (x, y + height) |
(200, 550) |
| bottom-right | (x + width, y + height) |
(300, 550) |
Movement
We make an object move around the screen by changing its origin coordinates.
| Coordinate change | Movement |
|---|---|
| increase x | moves right |
| decrease x | moves left |
| increase y | moves down |
| decrease y | moves up |
Planning
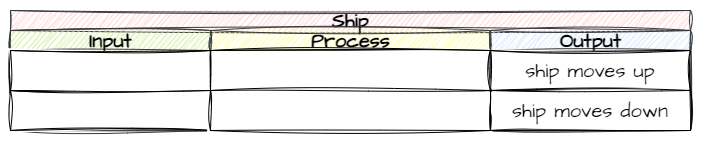
To plan what our objects do, we'll use an Input Process Output (IPO) table. To fill in an IPO table:
- Start with the output we want.
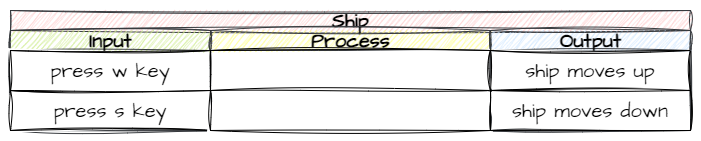
- Choose an input from the ones available to trigger it.
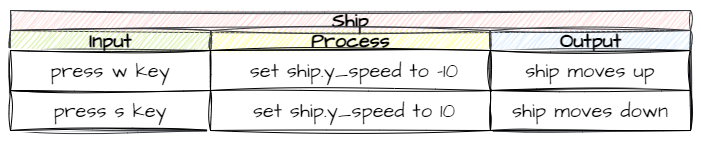
- Work out the process that gets us from the input to the output.
Output
For this lesson, we want the spaceship to move up and down. So that's our output.
Input
What input options do we have? The keyboard and mouse are the most common. It's really our choice, so let's use the keyboard. Which keys? The most common keys for up and down in games are W and S, so let's use them.
Process
So how do we get from key presses to a moving ship? Thinking about how Pygame handles graphics, we need to change the y value of the ship's origin: decrease it when W is pressed and increase it when S is pressed.
Let's check the GameFrame API for RoomObject variables that could help. There are two possibilities:
- We could change
y, but that would only move the ship once per press, so the player would have to keep tapping keys to keep moving. - We could change
y_speed. The API says this is the number of pixels the object moves up or down every frame. If we set it to-10for up and10for down, the ship keeps moving after the player presses the key. That sounds like our best bet.
That's the planning finished. Now let's code it.
Add the Ship RoomObject
Adding the Ship starts with the same steps we used for the Title:
- Define the
Shipclass - Initialise it and give it an image
- Add it to Objects/__init__.py
- Add a Ship object to the GamePlay Room
Then we'll make it respond to keys:
- Register the Ship for key events
- Write its
key_pressedmethod
Create a new file in the Objects folder, add the code below and save it as Ship.py.
| Objects/Ship.py | |
|---|---|
Code explanation
- line 1 → imports the
RoomObjectclass from GameFrame. - line 3 → defines the
Shipclass as a subclass ofRoomObject. - lines 4–6 → a docstring that explains what the class is for.
- line 8 → defines the
__init__method, which takes the Room and the ship's starting position. - lines 9–11 → a docstring that explains what the method does.
- line 12 → runs
RoomObject's__init__method, so the Ship inherits everything a RoomObject has. - line 15 → loads Ship.png from the Images folder.
- line 16 → gives the Ship its image, 100 pixels wide and 100 pixels high.
Open Objects/__init__.py, add the highlighted code below and save it.
Code explanation
- line 2 → imports the
Shipclass, so GameFrame can find it.
Open Rooms/GamePlay.py, add the highlighted code below and save it.
| Rooms/GamePlay.py | |
|---|---|
Code explanation
- line 2 → imports the
Shipclass so the Room can use it. - line 12 → creates a Ship at
(25, 50), near the top-left of the screen, and adds it to the Room.
PRIMM
- Predict what you'll see after pressing space on the welcome screen.
- Run MainController.py and press space.
- Investigate: what happens when you press W or S? Why?
We should have a spaceship in the GamePlay Room, but it doesn't move yet.
Make the Ship move
Go back to Objects/Ship.py and add the highlighted code below.
Code explanation
- line 2 → imports Pygame, so we can use its key names.
- line 20 → registers the Ship for key events, so GameFrame calls
key_pressedon every frame. - line 22 → defines the
key_pressedevent handler, just like the one we wrote for the Title. - lines 23–25 → a docstring that explains what the method does.
- line 27 → checks if W is pressed…
- line 28 → …and sets the Ship's
y_speedto-10, so it moves 10 pixels up every frame. - line 29 → otherwise, checks if S is pressed…
- line 30 → …and sets
y_speedto10, so it moves 10 pixels down every frame.
PRIMM
- Predict how the ship will move when you press W, then let go.
- Run MainController.py, press space, then try W and S.
- Investigate: what happens when the ship reaches the top or bottom of the screen? We'll fix that in Lesson 5.
Commit and push
We've finished and tested another section of code, so you know what to do.
- In GitHub Desktop, type Created Spaceship object in the Summary box.
- Click Commit to main.
- Click Push origin.