OLED Display
On this page we will learn
- how to connect the OLED Display
- how to draw pixels, lines, rectangles, circles and arcs
- how to show text and images
- how to draw graphs
- how to change the display's contrast, rotation and power
Terminology
- OLED – an organic light-emitting diode screen, which is a display made of tiny pixels that each give off their own light.
- PBM – a portable bitmap, which is a simple image file made only of black and white pixels.
- contrast – how bright the screen is compared to its dark parts, which sets how easy it is to see.
The PiicoDev OLED Display is a 128 × 64 pixel white-on-black screen that can show text, shapes, graphs and images.
Possible uses:
- showing sensor readings and units
- menus and scoreboards
- live graphs
- simple animations and games
Connect it
-
Make sure the ASW switch on the back is off.
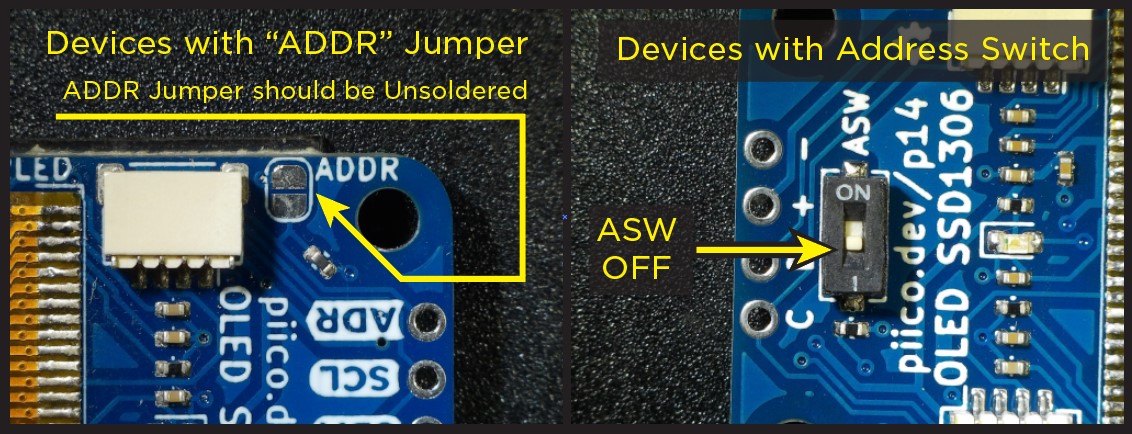
-
Connect the display to the PiicoDev adapter with a PiicoDev cable. See Using PiicoDev.
- Upload these files to the micro:bit with
main.py:PiicoDev_Unified.pyPiicoDev_SSD1306.pyfont-pet-me-128.dat→ needed fortext()piicodev-logo.pbm→ only needed for theload_pbm()example
- Pixels are located by
(x, y)coordinates.(0, 0)is the top left and(127, 63)is the bottom right. - Colour
1is white (on) and0is black (off). - Drawing happens in memory. Nothing appears on the screen until
show(), which is why every example calls it.
Name the display oled
The micro:bit already uses the name display for its LED display, so call the OLED oled.
Set it up
Methods
| Method | Parameters | Returns | Description |
|---|---|---|---|
oled.show() |
none | none | Sends everything drawn to the screen |
oled.fill(c) |
c: 0 or 1 |
none | Fills the whole screen. fill(0) clears it. |
oled.pixel(x, y, c) |
x: 0–127, y: 0–63, c: 0 or 1 |
none | Draws one pixel |
oled.hline(x, y, l, c) |
start x, y; length l |
none | Draws a horizontal line to the right |
oled.vline(x, y, l, c) |
start x, y; length l |
none | Draws a vertical line downwards |
oled.line(x1, y1, x2, y2, c) |
two end points | none | Draws a line between two points |
oled.rect(x, y, w, h, c) |
top-left x, y; width w; height h |
none | Draws a rectangle outline |
oled.fill_rect(x, y, w, h, c) |
top-left x, y; width w; height h |
none | Draws a filled rectangle |
oled.circ(x, y, r, t, c) |
centre x, y; radius r; thickness t (0–1) |
none | Draws a circle. t=1 is filled. |
oled.arc(x, y, r, start, end, t, c) |
centre, radius, start and end angles (0–360), thickness | none | Draws part of a circle |
oled.text(s, x, y, c=1) |
string s (up to 16 characters); top-left x, y |
none | Writes text. Each character is 8 × 8 pixels. |
oled.load_pbm(filename, c) |
.pbm image file name |
none | Draws a 128 × 64 image |
oled.graph2D(minValue, maxValue) |
lowest and highest values to plot | graph | Creates a scrolling graph |
oled.updateGraph2D(graph, value) |
the graph; the new value | none | Adds a value to a graph |
oled.invert(i) |
i: 0 or 1 |
none | Swaps black and white |
oled.setContrast(c) |
c: 0–255 |
none | Sets the screen brightness |
oled.rotate(r) |
r: 0 or 1 |
none | Flips the screen upside down |
oled.poweroff() / oled.poweron() |
none | none | Turns the screen off or back on |
fill()
Fills the whole screen with one colour: 1 for white, 0 for black. fill(0) clears the screen.
PRIMM
- Predict what you think will happen. Be specific.
- Run the program.
- Time to investigate the code. What does each line do?
Code explanation
- line 1 → imports all the commands from the
microbitlibrary. - line 2 → imports all the commands from the OLED driver.
- line 5 → creates the display and calls it
oled. - line 8 → starts an endless loop.
- line 9 → fills the screen with white, in memory.
- line 10 → sends it to the screen.
pixel()
Draws a single pixel at (x, y).
PRIMM
- Predict what you think will happen. Be specific.
- Run the program.
- Time to investigate the code. What does each line do?
Code explanation
- line 1 → imports all the commands from the
microbitlibrary. - line 2 → imports all the commands from the OLED driver.
- line 5 → creates the display and calls it
oled. - line 8 → starts an endless loop.
- line 9 → draws a white pixel in the middle of the screen.
- line 10 → sends it to the screen.
hline()
Draws a horizontal line from a starting point, going right.
PRIMM
- Predict what you think will happen. Be specific.
- Run the program.
- Time to investigate the code. What does each line do?
Code explanation
- line 1 → imports all the commands from the
microbitlibrary. - line 2 → imports all the commands from the OLED driver.
- line 5 → creates the display and calls it
oled. - line 8 → starts an endless loop.
- line 9 → draws an 80-pixel horizontal line starting at
(10, 10). - line 10 → sends it to the screen.
vline()
Draws a vertical line from a starting point, going down.
PRIMM
- Predict what you think will happen. Be specific.
- Run the program.
- Time to investigate the code. What does each line do?
Code explanation
- line 1 → imports all the commands from the
microbitlibrary. - line 2 → imports all the commands from the OLED driver.
- line 5 → creates the display and calls it
oled. - line 8 → starts an endless loop.
- line 9 → draws a 40-pixel vertical line starting at
(10, 10). - line 10 → sends it to the screen.
line()
Draws a straight line between two points.
PRIMM
- Predict what you think will happen. Be specific.
- Run the program.
- Time to investigate the code. What does each line do?
Code explanation
- line 1 → imports all the commands from the
microbitlibrary. - line 2 → imports all the commands from the OLED driver.
- line 5 → creates the display and calls it
oled. - line 8 → starts an endless loop.
- line 9 → draws a line from the bottom left
(0, 63)to the top right(127, 0). - line 10 → sends it to the screen.
rect()
Draws the outline of a rectangle from its top-left corner, width and height.
PRIMM
- Predict what you think will happen. Be specific.
- Run the program.
- Time to investigate the code. What does each line do?
Code explanation
- line 1 → imports all the commands from the
microbitlibrary. - line 2 → imports all the commands from the OLED driver.
- line 5 → creates the display and calls it
oled. - line 8 → starts an endless loop.
- line 9 → draws the outline of a 40 × 30 rectangle with its top-left corner at
(10, 10). - line 10 → sends it to the screen.
fill_rect()
Draws a filled rectangle from its top-left corner, width and height.
PRIMM
- Predict what you think will happen. Be specific.
- Run the program.
- Time to investigate the code. What does each line do?
Code explanation
- line 1 → imports all the commands from the
microbitlibrary. - line 2 → imports all the commands from the OLED driver.
- line 5 → creates the display and calls it
oled. - line 8 → starts an endless loop.
- line 9 → draws a filled 40 × 30 rectangle with its top-left corner at
(10, 10). - line 10 → sends it to the screen.
circ()
Draws a circle from its centre and radius. Thickness 1 makes a filled circle; smaller values make a ring.
PRIMM
- Predict what you think will happen. Be specific.
- Run the program.
- Time to investigate the code. What does each line do?
Code explanation
- line 1 → imports all the commands from the
microbitlibrary. - line 2 → imports all the commands from the OLED driver.
- line 5 → creates the display and calls it
oled. - line 8 → starts an endless loop.
- line 9 → draws a filled circle (thickness
1) with radius 20 in the middle of the screen. - line 10 → sends it to the screen.
arc()
Draws part of a circle, between a start angle and an end angle.
PRIMM
- Predict what you think will happen. Be specific.
- Run the program.
- Time to investigate the code. What does each line do?
Code explanation
- line 1 → imports all the commands from the
microbitlibrary. - line 2 → imports all the commands from the OLED driver.
- line 5 → creates the display and calls it
oled. - line 8 → starts an endless loop.
- line 9 → draws the part of a circle from 0° to 180° around the middle of the screen, with radius 25 and thickness
0.3. - line 10 → sends it to the screen.
text()
Writes text on the screen, starting at the top-left corner you give. Each character is 8 × 8 pixels.
PRIMM
- Predict what you think will happen. Be specific.
- Run the program.
- Time to investigate the code. What does each line do?
Code explanation
- line 1 → imports all the commands from the
microbitlibrary. - line 2 → imports all the commands from the OLED driver.
- line 5 → creates the display and calls it
oled. - line 8 → starts an endless loop.
- line 9 → writes
Hello!at the top left, in memory. - line 10 → sends it to the screen.
load_pbm()
Draws an image from a .pbm file.
Images must be 128 × 64 PBM files uploaded to the micro:bit. They take a few seconds to draw because the micro:bit has very little memory.
PRIMM
- Predict what you think will happen. Be specific.
- Run the program.
- Time to investigate the code. What does each line do?
Code explanation
- line 1 → imports all the commands from the
microbitlibrary. - line 2 → imports all the commands from the OLED driver.
- line 5 → creates the display and calls it
oled. - line 8 → starts an endless loop.
- line 9 → draws the image in
piicodev-logo.pbmin white. - line 10 → sends it to the screen.
graph2D() and updateGraph2D()
graph2D() creates a graph, and updateGraph2D() adds a new value to it.
The graph starts at the right of the screen and scrolls left each time a new value is added.
PRIMM
- Predict what you think will happen. Be specific.
- Run the program.
- Time to investigate the code. What does each line do?
Code explanation
- line 1 → imports all the commands from the
microbitlibrary. - line 2 → imports all the commands from the OLED driver.
- line 5 → creates the display and calls it
oled. - line 6 → creates a graph for values from
0to255and calls itgraph. - line 9 → starts an endless loop.
- line 10 → clears the screen.
- line 11 → adds the micro:bit's light level to the graph.
- line 12 → shows the graph.
invert()
Swaps black and white on the whole screen: 1 inverts, 0 returns to normal.
PRIMM
- Predict what you think will happen. Be specific.
- Run the program.
- Time to investigate the code. What does each line do?
Code explanation
- line 1 → imports all the commands from the
microbitlibrary. - line 2 → imports all the commands from the OLED driver.
- line 5 → creates the display and calls it
oled. - line 6 → writes
Invertat the top left. - line 7 → sends it to the screen.
- line 10 → starts an endless loop.
- line 11 → swaps black and white.
setContrast()
Sets the brightness of the screen, from 0 (dimmest) to 255 (brightest).
PRIMM
- Predict what you think will happen. Be specific.
- Run the program.
- Time to investigate the code. What does each line do?
Code explanation
- line 1 → imports all the commands from the
microbitlibrary. - line 2 → imports all the commands from the OLED driver.
- line 5 → creates the display and calls it
oled. - line 6 → fills the screen with white.
- line 7 → sends it to the screen.
- line 10 → starts an endless loop.
- line 11 → sets the screen brightness to
10, much dimmer than the default255.
rotate()
Flips the screen upside down: 0 is upside down, 1 is the normal way up.
PRIMM
- Predict what you think will happen. Be specific.
- Run the program.
- Time to investigate the code. What does each line do?
Code explanation
- line 1 → imports all the commands from the
microbitlibrary. - line 2 → imports all the commands from the OLED driver.
- line 5 → creates the display and calls it
oled. - line 6 → writes
Rotateat the top left. - line 9 → starts an endless loop.
- line 10 → turns the screen upside down.
- line 11 → redraws the text the new way up.
poweroff() and poweron()
Turns the screen off and back on. What was on the screen is remembered while it is off.
PRIMM
- Predict what you think will happen. Be specific.
- Run the program.
- Time to investigate the code. What does each line do?
Code explanation
- line 1 → imports all the commands from the
microbitlibrary. - line 2 → imports all the commands from the OLED driver.
- line 5 → creates the display and calls it
oled. - line 6 → writes
On and offat the top left. - line 7 → shows it.
- line 10 → starts an endless loop.
- line 11 → turns the screen off. The text is remembered.
- line 12 → waits 1 second.
- line 13 → turns the screen back on.
- line 14 → waits 1 second before the loop repeats.
Documentation
Documentation is the official guide written by the people who made the code library, and we can use it to look up every method and its parameters, including ones that aren't covered on this page.