Colour Sensor
On this page we will learn
- how to connect the Colour Sensor
- how to read red, green and blue values
- how to read hue, saturation and value
- how to identify a colour
Terminology
- RGB – a way of describing a colour by how much red, green and blue light it contains.
- HSV – a way of describing a colour by its hue, saturation and value.
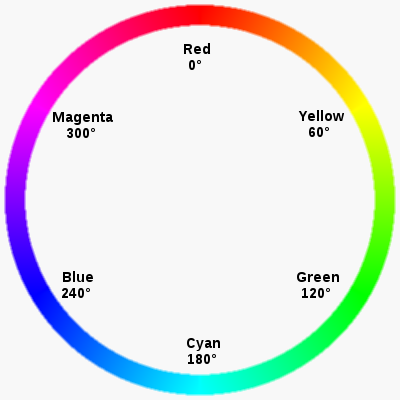
- hue – which colour something is, given as an angle on the colour wheel, such as red
0, green120and blue240. - saturation – how intense a colour is, from bright and strong to greyish.
- value (colour) – how light or dark a colour is.
- colour wheel – a circle of colours that lets us describe each colour by its position or angle around it.
- dictionary – a collection that stores values with names, called keys, so we can look each value up by its name.
- key – the name used to store and look up a value in a dictionary, such as
"red"indata["red"]. - ambient light – the general light in the surroundings.
- colour temperature – a measure, in kelvin, of how warm (yellowish) or cool (bluish) white light looks.
The PiicoDev Colour Sensor (VEML6040) measures the red, green, blue and white light reflected from an object, and can identify its colour.
Possible uses:
- sorting objects by colour
- line-following robots
- colour-matching games
- ambient light measurement
Connect it
- Connect the sensor to the PiicoDev adapter with a PiicoDev cable. See Using PiicoDev.
- Upload these files to the micro:bit with
main.py:PiicoDev_Unified.pyPiicoDev_VEML6040.py
Two ways to describe colour
RGB describes a colour by how much red, green and blue light it contains. Screens mix these three colours to make every other colour.
HSV describes a colour by:
- hue → which colour it is, as an angle on the colour wheel: red
0, green120, blue240 - saturation → how intense it is: bright red is high, reddish grey is low
- value → how light or dark it is
Hue is the easiest way to identify a colour, because one number tells you which colour it is.
Set it up
Methods
| Method | Parameters | Returns | Description |
|---|---|---|---|
sensor.readRGB() |
none | dictionary: red, green, blue, white (lux), cct (K) |
Red, green and blue light levels, plus ambient light and colour temperature |
sensor.readHSV() |
none | dictionary: hue (0–360), sat, val |
Hue, saturation and value |
sensor.classifyHue(hues, min_brightness=0) |
hues: dictionary of colour names and hue angles (optional) |
string | The name of the closest colour |
readRGB()
Returns the amount of red, green and blue light the sensor sees, plus the ambient light and colour temperature.
PRIMM
- Predict what you think will happen. Be specific.
- Run the program.
- Time to investigate the code. What does each line do?
Code explanation
- line 1 → imports all the commands from the
microbitlibrary. - line 2 → imports the Colour Sensor driver.
- line 5 → creates the sensor and calls it
sensor. - line 8 → starts an endless loop.
- line 9 → reads the RGB values. They are returned as a dictionary and stored in
data. - line 10 → prints the
red,greenandbluevalues from the dictionary. - line 11 → waits 500 milliseconds before the loop repeats.
Dictionaries
A dictionary stores values with names (called keys). data["red"] gets the value stored under the key "red".
readHSV()
Returns the colour the sensor sees as hue, saturation and value.
PRIMM
- Predict what you think will happen. Be specific.
- Run the program.
- Time to investigate the code. What does each line do?
Code explanation
- line 1 → imports all the commands from the
microbitlibrary. - line 2 → imports the Colour Sensor driver.
- line 5 → creates the sensor and calls it
sensor. - line 8 → starts an endless loop.
- line 9 → reads the HSV values as a dictionary and stores them in
data. - line 10 → prints the
hue,satandvalvalues. - line 11 → waits 500 milliseconds before the loop repeats.
classifyHue()
Returns the name of the colour the sensor sees.
By default, classifyHue() chooses from red, yellow, green, cyan, blue and magenta. Pass your own dictionary of names and hue angles to change the choices.
PRIMM
- Predict what you think will happen. Be specific.
- Run the program.
- Time to investigate the code. What does each line do?
Code explanation
- line 1 → imports all the commands from the
microbitlibrary. - line 2 → imports the Colour Sensor driver.
- line 5 → creates the sensor and calls it
sensor. - line 8 → starts an endless loop.
- line 9 → finds the closest colour name and stores it in
colour. - line 10 → prints the colour name.
- line 11 → waits 500 milliseconds before the loop repeats.
Documentation
Documentation is the official guide written by the people who made the code library, and we can use it to look up every method and its parameters, including ones that aren't covered on this page.
Exercises
PRIMM
Time to modify the code and see what happens.
Starter files are in the colour folder of your tutorial files. Solutions are on the Exercise Solutions page.
Exercise 1
Starter: colour/ex1_rgb_dictionary
Can you print the whole dictionary returned by readRGB() every second? What do white and cct show?
Exercise 2
Starter: colour/ex2_show_colour
Can you show the first letter of the colour the sensor is looking at on the micro:bit display? For example, R for red.