Using PiicoDev
On this page we will learn
- what PiicoDev modules are
- how to connect a module to the micro:bit
- which files a PiicoDev program needs
- how to upload the driver files
Terminology
- PiicoDev – a range of plug-and-play sensors and output modules made by Core Electronics that connect with the same cable, with no soldering needed.
- adapter – a board that the micro:bit plugs into so PiicoDev modules can be connected to it.
- address switch – a small switch (marked ASW) on some PiicoDev modules that lets us connect two of the same module at once.
- device driver – a file of code that gives our program the commands to control one type of module.
PiicoDev is a range of plug-and-play sensors and output modules made by the Australian company Core Electronics. Every PiicoDev module uses the same cable, so we can connect modules to the micro:bit without soldering or breadboards.
Connect a module
- Plug the micro:bit into the PiicoDev Adapter for micro:bit, with the buttons and LED display facing up.
- Connect the module to the adapter with a PiicoDev cable.
- To use more than one module, connect them in a chain: adapter → module → module.
- Connect the micro:bit to your computer with the USB cable.
Address switches (ASW)
Some modules have small ASW switches. These let you connect two of the same module at once. Unless a page tells you otherwise, keep all ASW switches off.
Files a PiicoDev program needs
The code for the micro:bit's own components is already on the micro:bit. The code for PiicoDev modules is not, so we need to add extra files to every PiicoDev program folder, next to main.py:
PiicoDev_Unified.py→ handles communication with all PiicoDev modules. You need one copy in each program folder.- a device driver → the commands for one type of module. You need one driver for each type of module you use.
For example, a program that uses the Distance Sensor and the OLED Module needs main.py, PiicoDev_Unified.py, PiicoDev_VL53L1X.py and PiicoDev_SSD1306.py.
The example and exercise folders in your tutorial files already contain the files they need.
Device drivers
| Module | Driver file | Extra files |
|---|---|---|
| Atmospheric Sensor | PiicoDev_BME280.py |
|
| Colour Sensor | PiicoDev_VEML6040.py |
|
| Distance Sensor | PiicoDev_VL53L1X.py |
|
| Potentiometer (rotary and slide) | PiicoDev_Potentiometer.py |
|
| Button | PiicoDev_Switch.py |
|
| Real Time Clock | PiicoDev_RV3028.py |
|
| 3x RGB LED | PiicoDev_RGB.py |
|
| OLED Module | PiicoDev_SSD1306.py |
font-pet-me-128.dat for text |
| Servo Driver | PiicoDev_Servo.py |
Upload the files
A PiicoDev program only works when all its files are on the micro:bit, so we upload them together:
- Stop any running program.
-
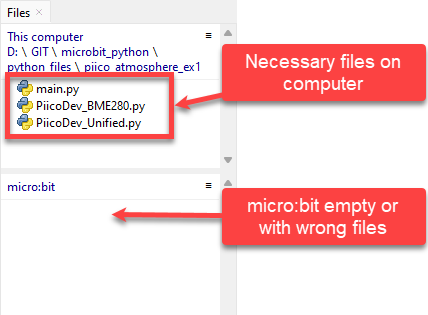
In the This computer part of the Files panel, open the program folder.
-
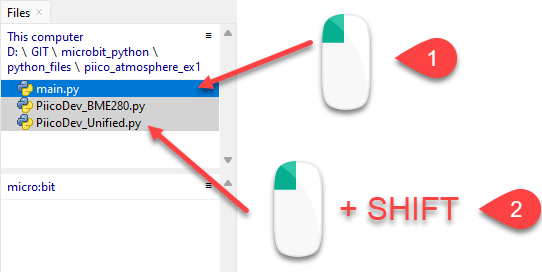
Click the first file, hold Shift and click the last file to select them all.
-
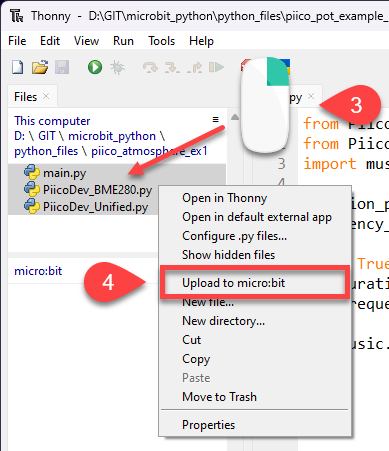
Right-click the selected files and choose Upload to micro:bit.
-
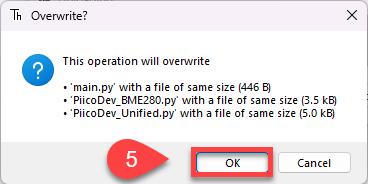
If Thonny asks whether to overwrite files with the same names, click OK.
-
Open
main.pyand run it.
Tip
Driver files stay on the micro:bit after they are uploaded. You only need to upload them again when you use a module that needs a different driver. While you are testing, you can run main.py straight from Thonny without uploading it each time.
Remove drivers you aren't using
The micro:bit has very limited memory for storing files. Driver files left over from earlier projects fill this space and can stop new files uploading or programs running.
Before uploading a new project, check the BBC micro:bit part of the Files panel. Right-click any driver files the new project doesn't use and choose Delete.