Potentiometers
On this page we will learn
- how to connect a potentiometer
- how to read its value
- how to change the range of values it gives
- how to use more than one potentiometer
Terminology
- potentiometer – an input, also called a pot, that gives a value which changes smoothly as we turn a knob or move a slider.
- ID switch – a small switch on the back of a PiicoDev module that gives it a different ID so we can use more than one at once.
- property – a value that belongs to an object, such as
pot.value, that we read or set without brackets. - range – the lowest and highest values a reading can give.
- raw value – a sensor reading before it has been scaled into a more useful range.
The PiicoDev Rotary and Slide Potentiometers ("pots") give a value that changes smoothly as you turn the knob or move the slider.
Possible uses:
- volume and brightness controls
- game controllers
- dials for setting a value, such as a timer
- menu scrolling
Connect it
- Connect the potentiometer to the PiicoDev adapter with a PiicoDev cable. See Using PiicoDev.
- Upload these files to the micro:bit with
main.py:PiicoDev_Unified.pyPiicoDev_Potentiometer.py
- The rotary and slide potentiometers use the same code.
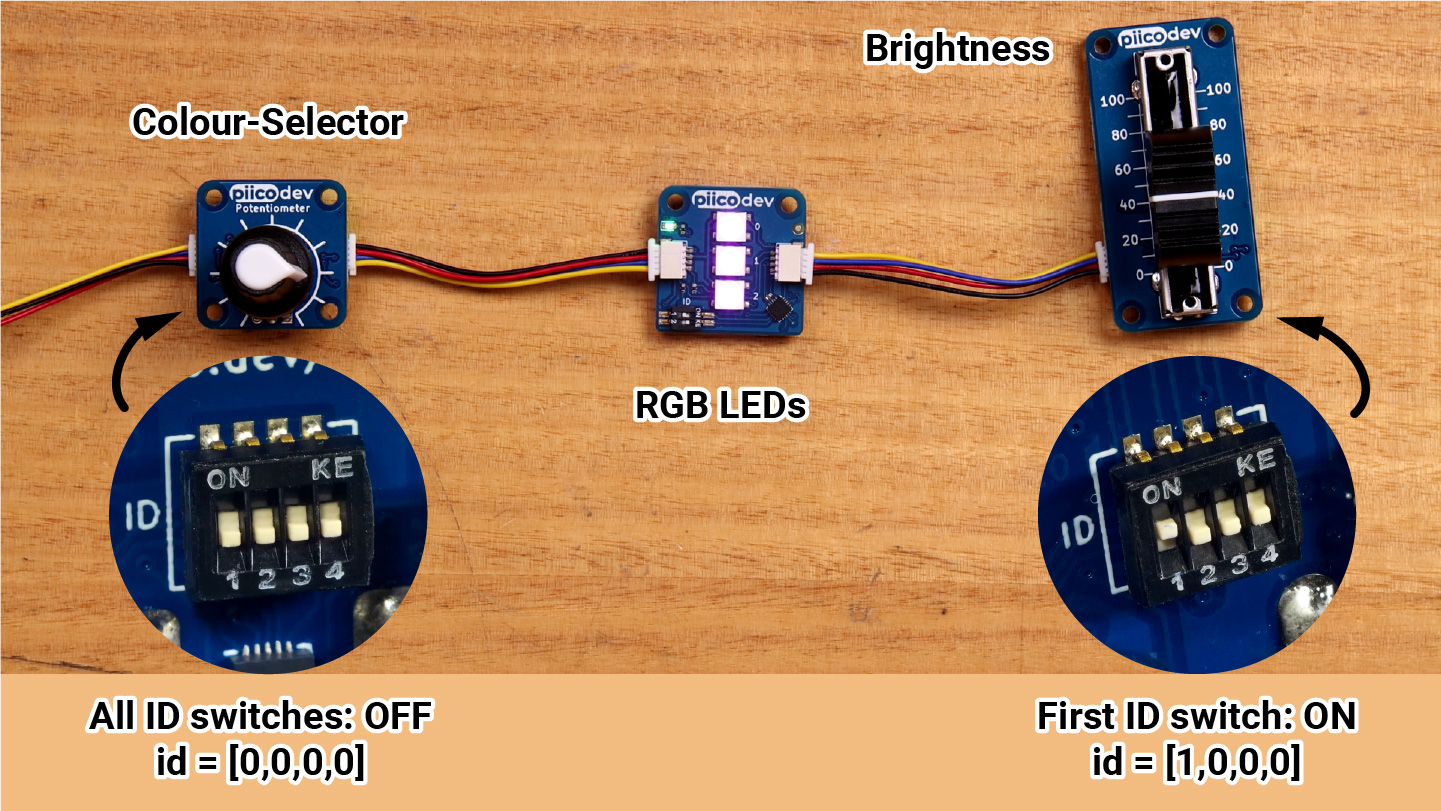
- To use more than one pot, give each one a different setting on the ID switches on its back. The image shows ID
1, 0, 0, 0.
Set it up
Methods
| Method | Parameters | Returns | Description |
|---|---|---|---|
pot.value |
none | float | Position of the knob or slider, from minimum to maximum (default 0 to 100) |
pot.minimum |
set to a number | float | The value at one end of the travel (default 0) |
pot.maximum |
set to a number | float | The value at the other end of the travel (default 100) |
pot.raw |
none | int (0–1023) | The unscaled reading |
PiicoDev_Potentiometer(id=[0, 0, 0, 0]) |
id: ID switch positions |
pot | Creates a pot with a particular ID switch setting |
value, minimum, maximum and raw are properties, so they have no brackets.
value
Gives the position of the knob or slider, from minimum to maximum (0 to 100 unless you change them).
PRIMM
- Predict what you think will happen. Be specific.
- Run the program.
- Time to investigate the code. What does each line do?
Code explanation
- line 1 → imports all the commands from the
microbitlibrary. - line 2 → imports the Potentiometer driver.
- line 5 → creates the pot and calls it
pot. - line 8 → starts an endless loop.
- line 9 → prints the pot's value (
0to100) in the Shell. - line 10 → waits 100 milliseconds before the loop repeats.
minimum and maximum
Set the values value gives at each end of the knob's or slider's travel.
Change the range of value to suit your project, for example 0 to 9 to match the micro:bit display's brightness levels.
PRIMM
- Predict what you think will happen. Be specific.
- Run the program.
- Time to investigate the code. What does each line do?
Code explanation
- line 1 → imports all the commands from the
microbitlibrary. - line 2 → imports the Potentiometer driver.
- line 5 → creates the pot and calls it
pot. - line 6 → sets the lowest value to
0. - line 7 → sets the highest value to
9. - line 10 → starts an endless loop.
- line 11 → prints the pot's value, now from
0to9, in the Shell. - line 12 → waits 100 milliseconds before the loop repeats.
raw
Gives the unscaled reading from the pot, from 0 to 1023. It ignores minimum and maximum.
PRIMM
- Predict what you think will happen. Be specific.
- Run the program.
- Time to investigate the code. What does each line do?
Code explanation
- line 1 → imports all the commands from the
microbitlibrary. - line 2 → imports the Potentiometer driver.
- line 5 → creates the pot and calls it
pot. - line 8 → starts an endless loop.
- line 9 → prints the unscaled reading in the Shell.
- line 10 → waits 100 milliseconds before the loop repeats.
Using more than one pot
Each pot is created with the ID matching its switches, so your program can tell them apart.
Connect a rotary pot with ID 0, 0, 0, 0 and a slide pot with ID 1, 0, 0, 0.
PRIMM
- Predict what you think will happen. Be specific.
- Run the program.
- Time to investigate the code. What does each line do?
Code explanation
- line 1 → imports all the commands from the
microbitlibrary. - line 2 → imports the Potentiometer driver.
- line 5 → creates the pot with ID
0, 0, 0, 0and calls itknob. - line 6 → creates the pot with ID
1, 0, 0, 0and calls itslider. - line 9 → starts an endless loop.
- line 10 → prints both values in the Shell.
- line 11 → waits 100 milliseconds before the loop repeats.
Documentation
Documentation is the official guide written by the people who made the code library, and we can use it to look up every method and its parameters, including ones that aren't covered on this page.