Glowbit Rainbow
On this page we will learn
- how to connect the Glowbit Rainbow
- how to set one LED's colour
- how to fill and clear all the LEDs
Terminology
- alligator clip – a spring-loaded metal clip on a wire used to make quick connections without soldering.
- GND – ground, the connection that completes an electrical circuit back to the negative side of the power.
- data pin – the pin that carries signals from the micro:bit to tell a device what to do.
- NeoPixel – a type of full-colour LED that can be joined in strips and controlled one at a time from a single data pin.
The Glowbit Rainbow is an arc of 13 full-colour LEDs, each of which can be set to any colour.
Possible uses:
- level meters for sound or sensor readings
- countdown timers
- decorative light effects
- colour-coded status displays
Connect it
Unplug the micro:bit's USB cable and battery before wiring. Connect the Glowbit to the micro:bit with alligator clips:
- black → micro:bit GND to Glowbit GND
- red → micro:bit 3V to Glowbit 3V
- yellow → micro:bit 0 to Glowbit Data
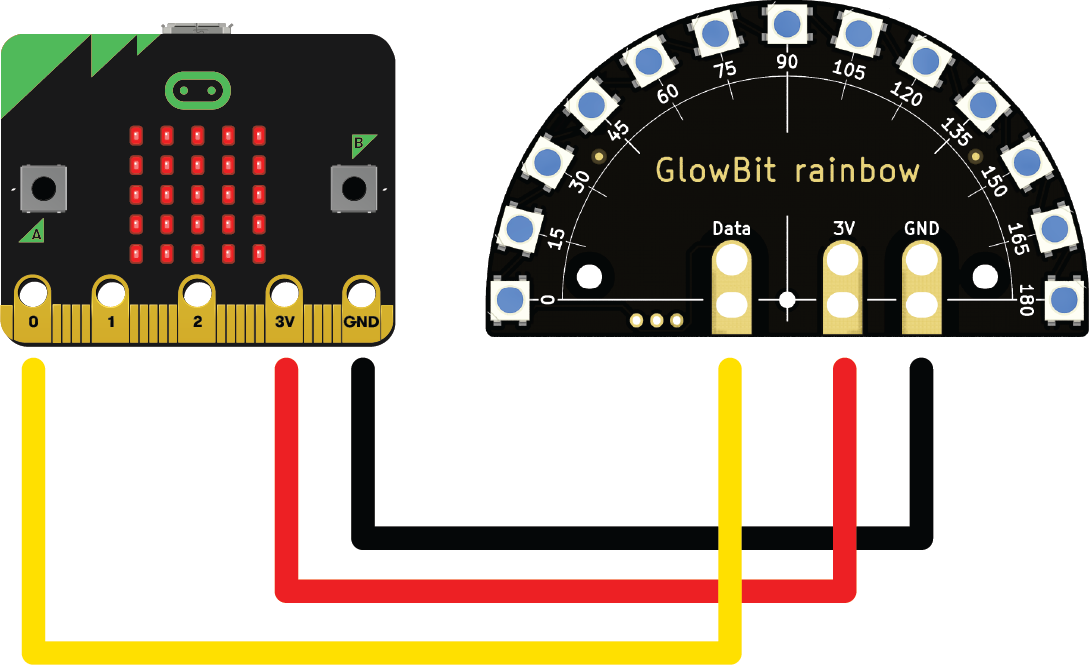
The Glowbit uses MicroPython's built-in neopixel module, so no extra files are needed.
- The LEDs are numbered
0to12. - Colours are tuples of three numbers,
(red, green, blue), each from0to255. - Changes only appear after
show().
Set it up
Methods
| Method | Parameters | Returns | Description |
|---|---|---|---|
neopixel.NeoPixel(pin, n) |
pin: the data pinn: number of LEDs |
NeoPixel | Creates the LED strip |
rainbow[n] = colour |
n: LED 0–12colour: (r, g, b) |
none | Sets one LED's colour |
rainbow.fill(colour) |
colour: (r, g, b) |
none | Sets every LED to one colour |
rainbow.show() |
none | none | Sends the colours to the LEDs |
rainbow.clear() |
none | none | Turns every LED off straight away |
Setting one LED
Sets the colour of one LED by its number. The colour appears after show().
PRIMM
- Predict what you think will happen. Be specific.
- Run the program.
- Time to investigate the code. What does each line do?
Code explanation
- line 1 → imports all the commands from the
microbitlibrary. - line 2 → imports the
neopixelmodule. - line 5 → creates a strip of 13 LEDs on pin 0 and calls it
rainbow. - line 8 → starts an endless loop.
- line 9 → sets the first LED to red.
- line 10 → sends the colours to the LEDs.
fill() and show()
fill() sets every LED to the same colour. show() sends the colours to the LEDs.
PRIMM
- Predict what you think will happen. Be specific.
- Run the program.
- Time to investigate the code. What does each line do?
Code explanation
- line 1 → imports all the commands from the
microbitlibrary. - line 2 → imports the
neopixelmodule. - line 5 → creates a strip of 13 LEDs on pin 0 and calls it
rainbow. - line 8 → starts an endless loop.
- line 9 → sets every LED to a dim green.
- line 10 → sends the colours to the LEDs.
clear()
Turns every LED off straight away.
PRIMM
- Predict what you think will happen. Be specific.
- Run the program.
- Time to investigate the code. What does each line do?
Code explanation
- line 1 → imports all the commands from the
microbitlibrary. - line 2 → imports the
neopixelmodule. - line 5 → creates a strip of 13 LEDs on pin 0 and calls it
rainbow. - line 8 → starts an endless loop.
- line 9 → sets every LED to a dim purple.
- line 10 → sends the colours to the LEDs.
- line 11 → waits 1 second.
- line 12 → turns every LED off.
- line 13 → waits 1 second before the loop repeats.
Documentation
Documentation is the official guide written by the people who made the code library, and we can use it to look up every method and its parameters, including ones that aren't covered on this page.