Lesson 6: Coordinates
In this lesson we will learn
- how to organise our code so it's easy to read and maintain
- how the turtle's screen coordinates work
- how to move the turtle to an exact position with
goto() - how to move without drawing using
penup()andpendown()
Terminology
- maintainability – how easy our code is for other people, or our future selves, to read, understand and change.
- coordinates – a pair of numbers written as
(x, y)that describe a position, with(0, 0)at the centre of the turtle window. - tuple – a group of values written in round brackets that works like a list but can't be changed.
- immutable – describes something that can't be changed once it has been created.
- commenting out – adding
#to the start of lines of code so Python ignores them, without deleting them.
Maintainability
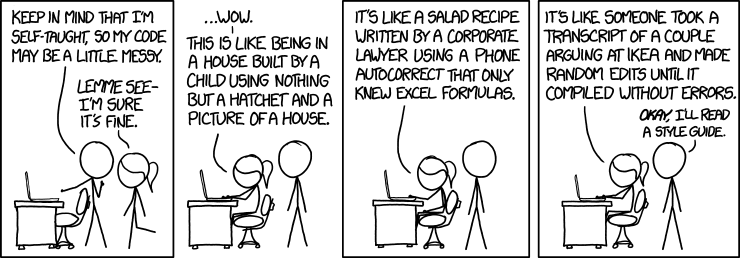
Code Quality by Randall Munroe, xkcd, CC BY-NC 2.5.
Maintainability means how easy our code is for other people to read and understand. This matters because the other person could be:
- someone helping us fix our code
- our teacher marking our work
- us, coming back to it six months later
Let's tidy up our code with two good habits:
- group code based on what it does
- use comments to say what each group is for
Change the code in shapes.py so it matches the code below. Then save it as coordinates.py (File → Save as…).
PRIMM
- Predict whether the turtle will draw anything different.
- Run the code. Did it match your prediction?
- Time to investigate the code. How is it organised?
Code explanation
- line 1 → imports the turtle module.
- lines 4–6 → store the window size and create a 500 × 500 pixel window.
- line 9 → creates a turtle called
my_ttl. - line 10 → gives
my_ttlthe arrow shape. - lines 13–15 → store the number of sides, the side length and the degrees in a full turn.
- line 18 → starts a
forloop that repeats once for each side. - line 19 → moves
my_ttlforward by the value inlength. - line 20 → turns
my_ttlleft byCIRCLE_DEGdivided bysides.
Anyone reading our program can now quickly find the code for setting up the screen, creating the turtle, setting the shape values and drawing the shape.
How turtle coordinates work
Think of the turtle window as a piece of graph paper made of pixels. Our window is 500 pixels wide and 500 pixels high. The turtle uses:
xfor left and right (horizontal)yfor up and down (vertical)
We describe a position with two numbers written like (x, y): the x value first, then the y value. These are called coordinates.
The turtle's coordinates start from the centre of the window. So in our 500 × 500 window:
xgoes from-250on the left to250on the rightygoes from-250at the bottom to250at the top- the centre of the window is
(0, 0)
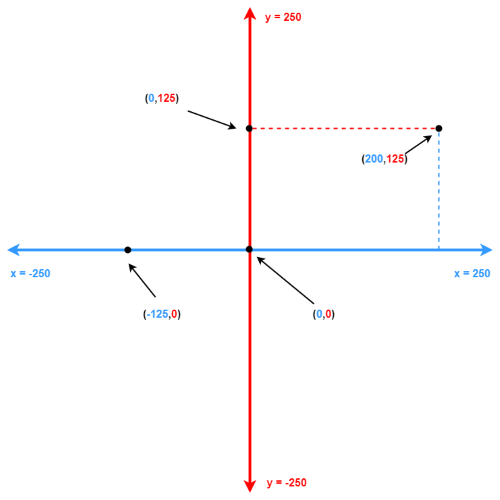
In summary:
- moving right (→) makes
xbigger - moving left (←) makes
xsmaller - moving up (↑) makes
ybigger - moving down (↓) makes
ysmaller
Tuples
Pairs of values written in brackets, like (200, 125), are called tuples. A tuple is like a list, with one big difference: we can change a list, but we can't change a tuple. Something that can't be changed is called immutable.
Now that we understand coordinates, we can tell the turtle to go to an exact position.
Using goto() to draw
Make these changes in coordinates.py:
- add
my_ttl.goto(0, 125)on line 17 - add a
#to the start of the lines under# draw shape
PRIMM
- Predict what the turtle will do.
- Run the code. Did it match your prediction?
- Time to investigate the code. What does each line do?
Code explanation
- line 1 → imports the turtle module.
- lines 4–6 → create a 500 × 500 pixel window.
- lines 9–10 → create a turtle called
my_ttlwith the arrow shape. - lines 13–15 → store the shape values.
- line 17 → moves
my_ttlstraight to the position wherexis0andyis125.
Adding # to the start of the loop lines turns them into comments, so Python ignores them. This is called commenting out code. It's useful when we're testing or fixing our program, because we can switch code off without deleting it.
PRIMM
Time to modify the code. Can you make the turtle visit each point shown in the coordinates diagram above?
Draw a border
Change coordinates.py so it matches the code below. Remember to remove the # from the start of the loop lines.
PRIMM
- Predict what the turtle will draw. Draw it on paper if that helps.
- Run the code. Did it match your prediction?
- Time to investigate the code. Change parts of it and see what happens.
Code explanation
- line 1 → imports the turtle module.
- lines 4–6 → create a 500 × 500 pixel window.
- lines 9–10 → create a turtle called
my_ttlwith the arrow shape. - line 13 → moves
my_ttlto the top-right corner of the border. - lines 14–17 → move
my_ttlto the top-left, bottom-left, bottom-right and top-right corners, drawing the four sides of the border. - line 18 → moves
my_ttlback to the centre of the window. - lines 21–23 → store the shape values.
- lines 26–28 → draw the hexagon.
Using penup() and pendown()
We have a border around our drawing, but there are two lines we don't want: one from the centre out to the corner, and one from the corner back to the centre.
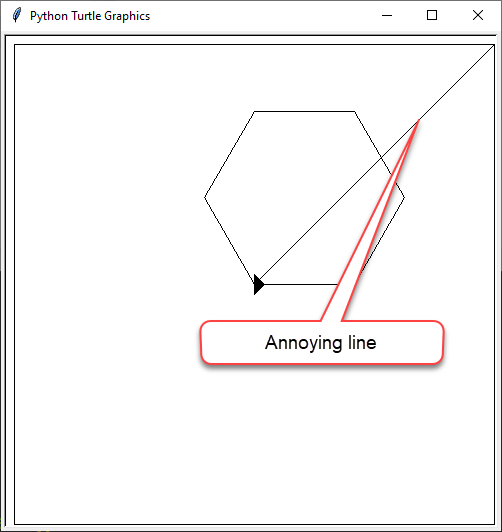
When we write on paper, we lift our pen to move without drawing, then put it back down to keep writing. The turtle can do the same with penup() and pendown().
Add lines 13, 15, 20 and 22 so our code matches the code below.
PRIMM
-
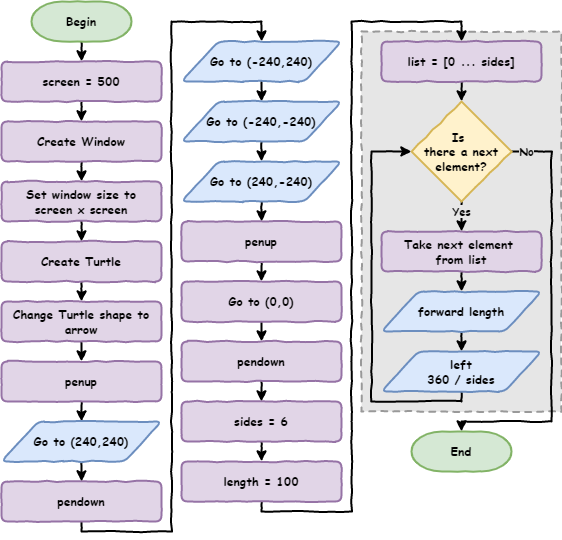
Predict what the turtle will draw. This flowchart may help.
-
Run the code. Did it match your prediction?
- Time to investigate the code. What does each line do?
Code explanation
- line 1 → imports the turtle module.
- lines 4–6 → create a 500 × 500 pixel window.
- lines 9–10 → create a turtle called
my_ttlwith the arrow shape. - line 13 → lifts the pen, so
my_ttlwon't draw while it moves. - line 14 → moves
my_ttlto the top-right corner without drawing. - line 15 → puts the pen down, so
my_ttldraws again. - lines 16–19 → draw the four sides of the border.
- line 20 → lifts the pen.
- line 21 → moves
my_ttlback to the centre without drawing. - line 22 → puts the pen down again.
- lines 25–27 → store the shape values.
- lines 30–32 → draw the hexagon.
Exercises
In this course, the exercises are the make part of PRIMM. Work through them to make your own code.
Starter files are in the lesson_06 folder of the tutorial files. Solutions are on the Exercise Solutions page.
Exercise 1
Starter: lesson_06/ex1_house
Can you draw a house made up of several shapes, using the turtle commands you've learnt? Try to keep your code DRY (Don't Repeat Yourself) by using loops where you can.