Stage 3: Character Creation
In this lesson we will learn
- how to create a new class and objects with their own attributes
- how objects of different classes are linked so they can interact
- how to write methods that control a character's behaviour
- how to update the main loop so it responds to new commands
Terminology
- namespace – a labelled section that keeps names organised, so each class can have its own attributes and methods without them getting mixed up.
Introduction
Now that the player can move around the dungeon, we need to make it interesting. In this stage we'll fill our dungeon with characters that the player can interact with.
Pseudocode
- Define a Character class
- Create characters
- Add characters to the rooms
- Include characters in the room descriptions
- Create character interactions:
    - talk method
    - hug method
    - fight method
- Add the interactions to the main loop
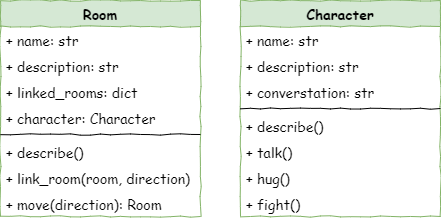
Class diagram
Character is a new class, so it needs a second class diagram.
We also need to add a character attribute to the Room class, so we can record who is in each room.
Define the Character class
In Thonny, create a new file and enter the code below. Save it as character.py in the same folder as main.py and room.py.
Code explanation
- line 3 → defines a new class called
Character. - line 5 → defines the dunder init method, which runs every time we make a new
Characterobject. - line 7 → stores the character's name in the object.
- line 8 → creates a
descriptionattribute, but leaves it empty (None) for now. - line 9 → creates a
conversationattribute for something the character might say, also empty for now.
Create characters
Now that we have a Character class, we can create Character objects in main.py. Add the highlighted code below.
PRIMM
- Predict what you think will happen. Be specific.
- Run the program.
- Time to investigate the code. What does each line do?
Code explanation
- line 4 → imports the
Characterclass from character.py so we can use it. - line 23 → makes a new
Characternamed Ugine and stores it in the variableugine. - line 24 → gives Ugine a description. Ugine has no conversation, so his
conversationattribute staysNone. - line 26 → makes a new
Characternamed Nigel and stores it innigel. - line 27 → gives Nigel a description.
- line 28 → gives Nigel something to say.
Add characters to the rooms
Now we have two classes that work together: Room and Character. We need a way to show which character is in which room. In the class diagram, the Room class has a new character attribute, so each room can store the character inside it.
This is an arbitrary decision. We could just as easily have added an attribute to the Character class that stores the room the character is in. Both are valid. The important thing is to be consistent, and to document our decision so others understand it. That's why the class diagram is so important.
Add a character attribute to the Room class
Return to room.py and add the highlighted line below.
Code explanation
- line 10 → creates a new attribute called
characterand sets it toNone, because a new room starts empty.
Put the characters in the rooms
Then return to main.py and put characters in our rooms with the highlighted code below.
PRIMM
- Predict what you think will happen. Be specific.
- Run the program.
- Time to investigate the code. What does each line do?
Code explanation
- line 32 → puts the character Ugine in the armoury.
- line 33 → puts the character Nigel in the lab.
The program should do nothing new, unless there's an error. That's because we haven't changed the room descriptions to include the characters yet. Let's do that now.
Include characters in the room description
Adding the characters to the room description takes two steps:
- Create a
describemethod in theCharacterclass. - Change the
describemethod in theRoomclass so it calls the character'sdescribemethod.
Add a describe method to the Character class
Go to character.py and add the highlighted code below.
Code explanation
- line 11 → defines a
describemethod for characters. TheRoomclass already has adescribemethod, but that's fine: they belong to different classes, socharacter.describe()androom.describe()are completely separate. - line 13 → prints the character's name and what they look like.
Namespaces
Imagine the wardrobe at home. There are different spots for different things: shelves for shirts, drawers for socks, hangers for jackets. When we need something, we go to the right spot and grab it.
Namespaces in programming work the same way. They're like labelled sections that keep code organised. Each class has its own namespace for its attributes and methods, just like each part of the wardrobe stores its own type of clothes.
That's why Room and Character can both have a method called describe without getting mixed up.
Change the Room class describe method
Before we change the room's describe method, there's a small issue. We have three rooms but only two characters, so the cavern has no character. We don't want the game to describe a character unless one is actually there.
Empty rooms have character set to None, so we should only describe the character when character is not None.
Return to room.py and change the describe method as highlighted below.
PRIMM
- Predict what you think will happen. Be specific.
- Run the program. Check that a character is only described when we enter a room that has one.
- Time to investigate the code. What does each line do?
Code explanation
- line 16 → checks whether this room has a character. We use
is notwhen comparing withNone. - line 17 → if there is a character, runs the character's
describemethod to show their details.
Create character interactions
We want to add three interactions with our characters:
- talk
- hug
- fight
If we look at the class diagram again, the Character class has a method for each of these interactions.
Add new methods to the Character class
Return to character.py. First, let's add the talk method with the highlighted code below.
Code explanation
- line 15 → defines the
talkmethod. - line 17 → checks whether the character has something to say. In main.py, Nigel has a conversation but Ugine doesn't, so the method needs to handle both.
- line 18 → if the character has a conversation, prints their name and what they say…
- lines 19–20 → …otherwise prints a message saying the character won't talk.
Now let's add both the hug and fight methods with the highlighted code below.
Code explanation
- line 22 → defines the
hugmethod. - line 24 → prints a message using the character's name.
- line 26 → defines the
fightmethod. - line 28 → prints a message using the character's name.
By now the code for these methods should look familiar. Each one:
- defines the method with
selfas the first argument - has a comment describing what the method does
- displays a message that uses one of the character's attributes
Add the interactions to the main loop
Now that characters can respond, we need to add the three commands (talk, hug and fight) to the event handler in the main loop.
Return to main.py and add the highlighted code.
PRIMM
- Predict what you think will happen. Be specific.
- Run the program. Try each command in a room with a character, and in the cavern.
- Time to investigate the code. What does each line do?
Code explanation
- line 54 → checks whether the player's command was
talk. - line 55 → checks whether there is a character in the current room. Some rooms (like the cavern) have no character, so we need to allow for this.
- line 56 → if there is a character, calls its
talkmethod… - lines 57–58 → …otherwise tells the player there's no one to talk to.
- lines 59–63 → do the same for the
hugcommand, calling the character'shugmethod. - lines 64–68 → do the same for the
fightcommand, calling the character'sfightmethod.
Exercises
So far we've used the first four steps of PRIMM. Now it's time to make.
Exercise 1
In Stage 1 we added an extra room. Can you put someone in it? It should:
- create a new character for each extra room, with a description and, if you like, a conversation
- add each new character to its room