Stage 1: Create Rooms
In this lesson we will learn
- how classes, attributes and methods work together
- how to read a UML class diagram and find the class name, attributes and methods
- how to make a Python class with an
__init__method and a method of our own - how to create objects from a class and give their attributes values
- how to link objects together and show those links in our output
Terminology
- computational thinking – breaking a real-world problem into precise, ordered and unambiguous steps that a computer can follow exactly.
- pseudocode – the steps of a program written in plain English instead of real code, so we can plan the logic without worrying about exact syntax.
- class diagram – a UML (Unified Modelling Language) drawing of a class as a table with three rows: the class name, its attributes and its methods.
- string – a data type that stores text, written inside quotation marks.
- dictionary – a Python collection that stores information in key:value pairs, so we can look up a key to get its value.
- argument – a piece of information we pass into a method when we call it, such as the direction for
link_rooms. - comment – a line starting with
#that Python ignores, used to explain our code or label the file. - naming convention – an agreed way of writing names, such as
snake_casefor most Python names andCamelCasefor class names, that makes code easier to read. - constructor – the special
__init__method, called the dunder init, that runs automatically each time we create an object and sets up its attributes. - self – the first argument of every method, which means "this object" so the method can use that object's own attributes.
- None – a special Python value that means "nothing", often used to create an attribute before it has a real value.
- key:value pair – one entry in a dictionary, where the key is the label we look up and the value is the information stored with it.
How we plan
When we work with computers, we need to break problems into clear, logical steps that a computer can follow exactly. Humans can rely on shortcuts, guesses and experience to fill in gaps, but computers can't. A computer only does exactly what it's told, so every step must be precise, ordered and unambiguous.
This computational thinking helps us turn a messy real-world problem into a series of simple, complete instructions that a computer can carry out without ever needing to "figure things out" on its own.
To help with this planning we will use pseudocode. Pseudocode is a simple way of writing out the steps of a program in plain English instead of real code, so we can focus on the logic without worrying about exact syntax. It shows what the program should do, in order, using clear instructions like IF, ELSE, REPEAT and OUTPUT.
Pseudocode doesn't run on a computer, but it helps us plan our thinking before we write real code. That makes mistakes easier to spot and the final program easier to build.
Planning
In this stage we want to create three rooms and link them together. Below is a rough map of our dungeon.
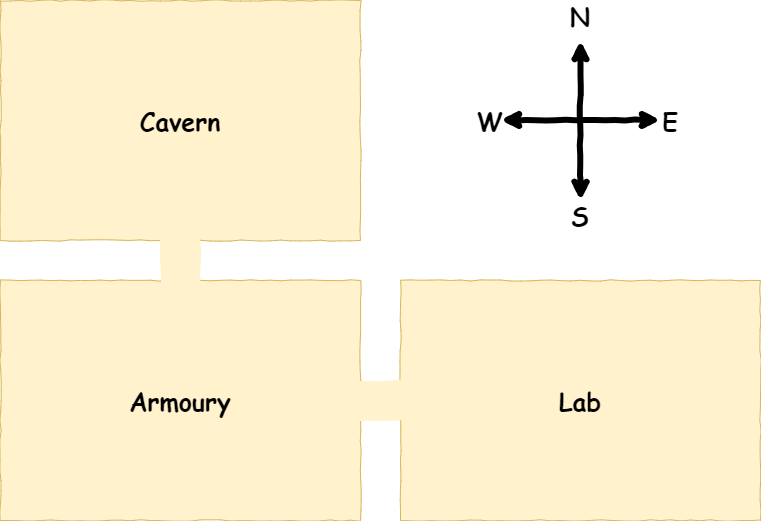
To do this we need two files:
- main.py → runs the program
- room.py → stores the
Roomclass
Pseudocode
- Define the Room class
- Create Room objects
- Describe Room objects
- Link the Room objects
- Include the linked Rooms when each Room object is described
Class diagram
UML class diagrams are a simple way to show what a class looks like and how it works with other classes.
In UML, a class is drawn as a table with three rows.
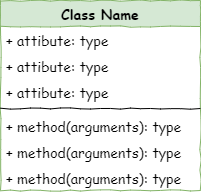
- The class name goes in row 1.
- The class attributes go in row 2, along with their data types.
- The class methods go in row 3, along with their arguments and the data type of any returned value.
The class diagram for the Room class is:
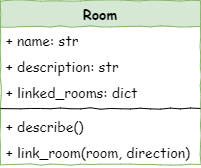
From the diagram we can tell:
- The class name is
Room. - The attributes are:
name, which is a stringdescription, which is a stringlinked_rooms, which is a dictionary
- The methods are:
describe, which takes no arguments and returns nothinglink_rooms, which returns nothing and takes two arguments:room_to_linkdirection
Diagram and code names
The class diagram image labels the method link_room(room, direction). In our code it's called link_rooms(room_to_link, direction). Use the name from the code.
Define the Room class
Open Thonny and create a new file. Then type the code below into it.
Code explanation
- line 3 → defines the
Roomclass. Everything indented under this line belongs to the class.
The first line, # room.py, is a comment with the file name. Our game is split across several files, so this helps us keep track of which file we're working on.
Naming conventions
Most Python names use snake_case, but class names use CamelCase, like Room.
Python won't give an error if we break this convention, but following it makes our code easier to read and maintain.
File names should stay lower case. This matters when we import our class from the file.
Dunder init method
Every Python class has a special method called the dunder init. Its real name is __init__. The "double underscores" are why we call it dunder.
The dunder init runs automatically every time we create a new object from a class. It sets up the object's attributes and gets it ready to use. We can also use it to run any other set-up the object needs.
Let's make a dunder init for our Room class.
Code explanation
- line 5 → starts the dunder init method.
selfis always the first argument of a method. It means "this object". If we make acavernroom, then inside the codeselfmeans "this specific cavern room".room_nameis the text we give the room when we create it.
- line 8 → sets the room's name.
self.namemeans "this room's name", androom_name.lower()changes the name to lower case before storing it. - line 9 → creates the room's
descriptionattribute and sets it toNonefor now. It's good practice to create every attribute inside__init__, even if it doesn't have a value yet.
Save room.py
Saving files
Our program uses several files, so where we save them matters.
main.py will import classes from our other files. The first place Python looks for them is the folder main.py is saved in.
Check that the file names are correct, including lower case letters and the .py extension.
Save the file as room.py in the deepest_dungeon folder we made in the Introduction for Students.
Create Room objects
Create a new file and save it as main.py in the deepest_dungeon folder. This file controls our game.
Type the following code into main.py.
We're about to run our program for the first time. Throughout this course we'll use the PRIMM process to learn from each piece of code. PRIMM stands for:
- Predict: before we run the code, we predict what we think will happen.
- Run: we run the program and see how accurate our prediction was. If it was wrong, how was the result different?
- Investigate: we go through the code and work out what each line does.
- Modify: we change the code and see what results we get.
- Make: we use our new understanding to make something new.
Let's try it now.
PRIMM
- Predict what you think will happen. Be specific.
- Run the program.
- Time to investigate the code. What does each line do?
Code explanation
- line 3 → imports our own
Roomclass from the file room.py. The class name is CamelCase (Room), and the file name is lower case (room). - line 6 → creates our first room.
Room("Cavern")makes a newRoomobject. When it's created, the__init__method runs automatically and saves"Cavern"as the room's name.cavern =stores the new room object in a variable calledcavern.
- line 8 → makes another
Roomobject called"Armoury"and stores it inarmoury. - line 10 → makes a third room called
"Laboratory"and stores it inlab. - line 12 → prints the
nameattribute stored inside thecavernobject.
PRIMM
Time to modify the code. Can you make it print the names of the other two Room objects?
Describe Room objects
If we look at the Room class, we'll notice that the description attribute currently stores None.
We want our rooms to have descriptions, so let's give them some values in main.py.
PRIMM
- Predict what you think will happen. Be specific.
- Run the program.
- Time to investigate the code. What does each line do?
Code explanation
- line 7 → sets the
descriptionattribute of thecavernroom to a sentence that describes it. - line 10 → gives the
armouryroom its description. - line 13 → gives the
labroom its description. - line 16 → prints the cavern's description.
PRIMM
Time to modify the code. Can you make it print the descriptions of the other two Room objects?
Describe method
It's better programming practice to use methods than to grab an object's attributes directly. In the class diagram, the Room class has a describe() method for this.
Using a method like describe() is a cleaner and safer way to show a room's details, so let's add it. Go back to room.py and add the highlighted code below.
Code explanation
- line 10 → defines the
describemethod.selfmeans "this object", just like in__init__. The method is indented one level because it belongs to the class. - line 12 → puts the room's name into a sentence and prints it. The
\nadds a blank line first. - line 13 → prints the room's description.
Then go back to main.py and replace lines 15 and 16 with the highlighted code below.
PRIMM
- Predict what you think will happen. Be specific.
- Run the program.
- Time to investigate the code. What does each line do?
Code explanation
- line 16 → runs the
describemethod of thecavernroom. - line 17 → runs the
describemethod of thearmouryroom. - line 18 → runs the
describemethod of thelabroom.
Link rooms
If we look at our map, we'll notice that the rooms are linked, so our adventurer can move between them.
- Cavern ↓ Armoury
- Armoury ↑ Cavern
- Armoury → Lab
- Lab ← Armoury
The class diagram shows that each room uses an attribute called linked_rooms and a method called link_rooms to connect rooms together.
linked_rooms is a dictionary. A dictionary stores information in key:value pairs.
- The key will be a direction like north, south, east or west.
- The value will be the
Roomobject in that direction.
For example, the Armoury's linked_rooms dictionary will look like this:
Dictionaries
A Python dictionary is like a real-life dictionary, but for our code.
In a real dictionary, we look up a word to find its meaning. In a Python dictionary, we look up a key to get its value.
Dictionaries are useful when we want to group information together and label it clearly so we can find it later.
The link_rooms method takes two pieces of information: the room we want to connect and the direction it's in. It adds this to the linked_rooms dictionary, so the room knows what's next to it.
Let's build it. First go back to room.py and add the highlighted code below.
Code explanation
- line 9 → creates the
linked_roomsattribute as an empty dictionary. - line 16 → defines the
link_roomsmethod. It takesself("this room"),room_to_link(the room to connect to) anddirection(north, south, east or west). - line 18 → adds the connection to the dictionary.
direction.lower()turns the direction into lower case and uses it as the key.= room_to_linkstores the room as the value for that direction.- If the direction wasn't there yet, it's added. If it was, the old value is replaced.
Then open main.py and add the highlighted code below.
PRIMM
- Predict what you think will happen. Be specific.
- Run the program.
- Time to investigate the code. What does each line do?
Code explanation
- line 16 → links the
armouryto the"south"of thecavern. - line 17 → links the
cavernto the"north"of thearmoury. - line 18 → links the
labto the"east"of thearmoury. - line 19 → links the
armouryto the"west"of thelab.
Did you predict that nothing would change? The rooms are linked, but we aren't showing the links yet. Notice that each connection needs two calls to link_rooms, one for each direction.
Include linked rooms in the description
Now let's show the linked rooms in each room's description. Go to room.py and add the highlighted code below.
PRIMM
- Predict what you think will happen. Be specific.
- Run the program.
- Time to investigate the code. What does each line do?
Code explanation
- line 15 → loops through every key in the
linked_roomsdictionary. Dictionaries can be used in aforloop, just like lists, anddirectionholds each key in turn (like"north"or"east"). - line 16 → prints a sentence showing which room is in that direction.
self.linked_rooms[direction].namegets the name of the room linked in that direction.
Exercises
So far we've used the first four steps of PRIMM. Now it's time to make.
Exercise 1
Can you add one or more rooms to the dungeon? It should:
- create one or more new
Roomobjects with a description - link each new room to at least one of the existing rooms, in both directions