Stage 1 - Create Rooms
How we plan
When working with computers you need to break problems into clear, logical steps that a computer can follow exactly. Humans can rely on shortcuts, guesses, and experience to fill in gaps, but computers cannot use those heuristics. A computer only does exactly what it is told, so every step must be precise, ordered, and unambiguous.
This computational thinking helps you turn a messy real-world problem into a series of simple, complete instructions that a computer can execute without ever needing to “figure things out” on its own.
To aid in this planning we will use pseudocode. Pseudocode is a simple way of writing out the steps of a program using plain English instead of real code, so you can focus on the logic without worrying about exact syntax. It shows what the program should do, in order, using clear instructions like IF, ELSE, REPEAT, and OUTPUT.
It doesn’t run on a computer, but it helps you plan your thinking before you start writing real code, making mistakes easier to spot and your final program easier to build.
Planning
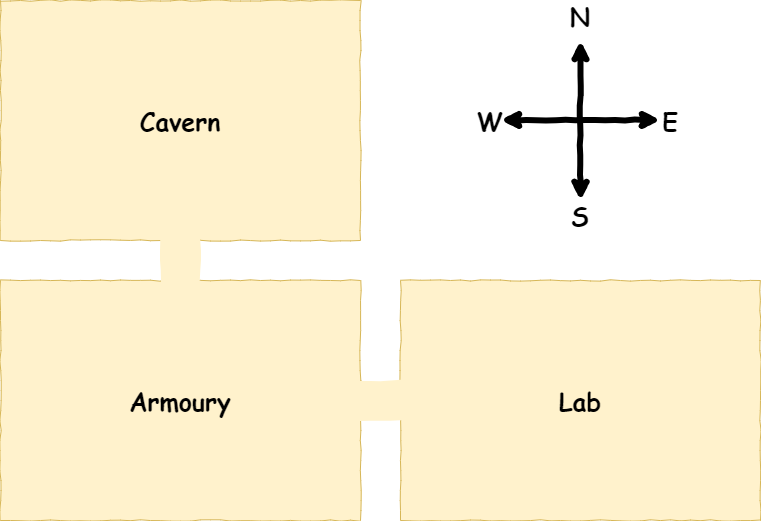
In this lesson we want to create three rooms and link those rooms together. Below is a rough map of our dungeon.
To achieve this we will need to create two files:
main.py → runs the program
room.py → stores information about the
Roomclass
In those two files we will need to do the following:
Stage 1 Pseudocode
Define the
RoomclassCreate
RoomobjectDescribe
RoomobjectsLink the
RoomobjectsInclude the linked
Roomswhen eachRoomobject is described
Class diagram
UML class diagrams are a simple way to show what a class looks like and how it works with other classes.
In UML, classes are represented by the three row table.
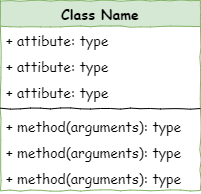
The class name goes in row 1
All the class attributes go in row 2, along with their datatype
The class methods are shown in row 3, along with the arguments and datatype of any returned value
The case diagram for the Room class is as follows:
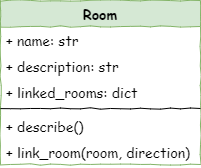
From the diagram we can tell:
The class name is
RoomThe attributes are:
namewhich is a string datatypedescriptionwhich is a string datatypelinked_roomswhich is a dictionary
The methods are:
describewhich takes no arguments and returns no valueslink_roomwhich returns nothing and takes two arguments:roomdirection
Define the Room class
Open up Thonny and, if needed, create a new file.
Then type the code below into the new file
1# room.py
2
3class Room():
Code Explanation
# room.py- is a simple comment containing the file name. Since this program involves multiple files, this is a simple way to keep track of which file you are currently working on.class Room():- defined theRoomclass object
Naming conventions
Most Python names use snake_case, but class names are different. Class names must use CamelCase, like Room.
Python won’t give you an error if you break this rule, but following it makes your code easier to read and maintain.
File names should stay lowercase. This matters when you import your class from the file.
Dunder init method
Every Python class has a special method called the dunder init. Its real name is __init__ — the “double underscores” are why we call it dunder.
The dunder init runs automatically every time you create a new object from a class. It sets up the object’s attributes and gets it ready to use. You can also use it to run any other setup the object needs.
Now we’ll make a dunder init for our Room class.
1# room.py
2
3class Room():
4
5    def __init__(self, room_name):
6        # intialise the room object
7
8        self.name = room_name.lower()
9        self.description = None
Code Explanation
def __init__(self, room_name):this line starts the dunder init method.selfis always the first argument in any class method. It means “this object”. If you make acavernroom, then inside the codeselfmeans “this specific cavern room”.room_nameis the text you give the room when you create it. It’s the name the object will use.
# initialise the room object→ this is just a comment explaining what the method does. Comments help keep your code easy to read.self.name = room_name.lower()→ this sets the room’s name.self.namemeans “this room’s name”.room_name.lower()changes the name to lowercase before storing it.
self.description = None→ this creates a description attribute for the room and sets it toNonefor now.self.descriptionmeans “this room’s description”.It’s good practice to create all attributes inside
__init__, even if they don’t have a value yet. Setting them toNonekeeps things organised.
Save room.py
Warning
Saving files Since this program will be using multiple files, the location they are saved is important.
The main.py file will be importing classes from the your other files. The first place it will look is within the local directory (ie. the folder it is saved in).
To minimise potential problems, you need to create a new folder for these tutorials.
It is also important to ensure you file names are correct, inlcuding the capilatisation and the .py extension.
Make a folder called deepest_dungeon. Calling your room.py save it in your deepest_dungeon folder.
Create Room objects
Create a new file. Save it as main.py in your deepest_dungeon folder. This file is going to control our game.
Then type to following code into the main.py
 1# main.py
 2
 3from room import Room
 4
 5# create rooms
 6cavern = Room("Cavern")
 7
 8armoury = Room("Armoury")
 9
10lab = Room("Laboratory")
11
12print(cavern.name)
We’re going to run our program for the first time, but before let’s introduce the PRIMM concept.
PRIMM
Throughout this course we will use the PRIMM process to reinforce our learning. PRIMM stands for Predict, Run, Investigate, Modify, and Make. It reflects effective programming practices and encourages curiosity in programming.
Predict: Before you run the code you need to predict what you think will happen. Go ahead and have a guess at what you think will happen.
Run: Then run the program and see how accurate your prediction was. If your prediction was incorrect, how was the result different?
Investigate: Go through the code and work out what each line of code does.
Modify: Edit the code. Change it around and see that results your get
Make: Use your new understanding of the code to make a different program.
Lets run through the PRIMM process now
Predict in detail what you think the program will do, then run the program.
Let’s investigate the new code line-by-line.
Code Explanation
# main.py→ this is just a comment so you know which file you’re looking at.from room import Room→ this imports your own class.Roomis the class you created.roomis the file room.py where that class lives.This line basically means: import the
Roomclass from the file room.py.The class name is CamelCase (
Room), and the file name is lowercase (room).
# create rooms→ another comment to organise your code. main.py will get long, so comments help keep things clear.cavern = Room("Cavern")→ this creates your first room.Room("Cavern")makes a newRoomobject.When you create it, the
__init__method runs automatically."Cavern"gets sent into__init__, which saves it as the room’s name.
cavern =stores the new room object in a variable calledcavern.
armoury = Room("Armoury")→ makes anotherRoomobject using the name"Armoury"and stores it inarmoury.lab = Room("Laboratory")→ makes a third room using"Laboratory"and stores it inlab.print(cavern.name)→ prints the name stored inside thecavernroom object.cavern.namegets the value of that attribute.printshows it on the screen.
Modify the code so that it prints the names of the other two Room objects.
Describe Room objects
If we look at the Room class we will notice that there is a description attribute which currently stores None.
1# room.py
2
3class Room():
4
5    def __init__(self, room_name):
6        # intialise the room object
7
8        self.name = room_name.lower()
9        self.description = None
We want our Room objects to have descriptions, so let’s assign some values to them.
 1# main.py
 2
 3from room import Room
 4
 5# create rooms
 6cavern = Room("Cavern")
 7cavern.description = "A room so big that the light of your torch doesn’t reach the walls."
 8
 9armoury = Room("Armoury")
10armoury.description = "The walls are lined with racks that once held weapons and armour."
11
12lab = Room("Laboratory")
13lab.description = "A strange odour hangs in a room filled with unknownable contraptions."
14
15print(cavern.name)
16print(cavern.description)
Predict in detail what you think the program will do, then run the program.
Let’s investigate the new code line-by-line.
Code Explanation
cavern.description = "A room so big that the light of your torch doesn’t reach the walls."→ this sets thedescriptionof thecavernroom. You’re giving the room a sentence that describes it.armoury.description = "The walls are lined with racks that once held weapons and armour."→ this gives thearmouryroom its description.lab.description = "A strange odour hangs in a room filled with unknownable contraptions."→ this gives thelabroom its description.print(cavern.description)→ this looks at the cavern’s description and prints it on the screen.
Modify the code so that it prints the descriptions of the other two Room objects.
Describe method
It’s better programming practice to use methods instead of grabbing an object’s attributes directly. In the class diagram, the Room class has a describe() method for this purpose.
Using a method like describe() is a cleaner and safer way to show a room’s details, so we’ll add that method to our code.
Go back to the room.py file and add the highlighted code below.
 1# room.py
 2
 3class Room():
 4
 5    def __init__(self,room_name):
 6        # initialises the room object
 7        self.name = room_name.lower()
 8        self.description = None
 9
10    def describe(self):
11        # displays a description of the room in the UI
12        print(f"\nYou are in the {self.name}")
13        print(self.description)
Then go back to main.py and replace lines 15 and 16 with the highlighted code below.
 1# main.py
 2
 3from room import Room
 4
 5# create rooms
 6cavern = Room("Cavern")
 7cavern.description = "A room so big that the light of your torch doesn’t reach the walls."
 8
 9armoury = Room("Armoury")
10armoury.description = "The walls are lined with racks that once held weapons and armour."
11
12lab = Room("Laboratory")
13lab.description = "A strange odour hangs in a room filled with unknownable contraptions."
14
15# describe rooms
16cavern.describe()
17armoury.describe()
18lab.describe()
Predict in detail what you think the program will do, then run the program.
Let’s investigate the new code line-by-line. First the code in room.py:
Code Explanation
def describe(self):→ this line starts thedescribemethod.defis how you define a function or method in Python.describeis the method’s name.(self)means “this object”, just like in__init__.The
:tells Python the indented block below belongs to this method.Methods inside a class must be indented one level.
# displays a description of the room in the UI→ this comment explains what the method does. Comments make your code easier to understand.print(f"\nYou are in the {self.name}")→ this line takes the room’s name and puts it into a sentence, then prints it to the screen.self.name→ “this room’s name”.
print(self.description)→ this prints whatever description the room has.
Now the code in main.py
Code Explanation
# describe rooms→ this is just a comment to organise the code.cavern.describe()→ this runs thedescribemethod for thecavernroom.armoury.describe()→ this runs thedescribemethod for thearmouryroom.lab.describe()→ this runs thedescribemethod for thelabroom.
Link rooms
If you look at our map you will notice that the rooms are linked, so that our adventure can move between them.
Cavern ↓ Armoury
Armoury ↑ Cavern
Armoury → Lab
Lab ← Armoury
The class diagram shows that each room uses an attribute called linked_rooms and a method called link_room(room, direction) to connect rooms together.
linked_rooms is a dictionary. A dictionary stores information in key:value pairs.
The key will be a direction like north, south, east, or west.
The value will be the
Roomobject that sits in that direction.
For example, the Armoury’s linked_rooms dictionary might look like a list of directions that lead to other rooms.
1{
2  "north" : cavern,
3  "east" : lab
4}
Dictionaries
A Python dictionary is like a real-life dictionary, but for your code.
In a real dictionary, you look up a word to find its meaning. In a Python dictionary, you look up a key to get its value.
Dictionaries are useful when you want to group information together and label it clearly so you can find it later.
The link_room method takes two pieces of information — the room you want to connect and the direction it’s in. It then adds this information to the linked_rooms dictionary so the room knows what’s next to it.
So lets implement this. First go back to room.py, and add the code highlighted below
 1# room.py
 2
 3class Room():
 4
 5    def __init__(self,room_name):
 6        # initialises the room object
 7        self.name = room_name.lower()
 8        self.description = None
 9        self.linked_rooms = {}
10
11    def describe(self):
12        # displays a description of the room in the UI
13        print(f"\nYou are in the {self.name}")
14        print(self.description)
15
16    def link_rooms(self, room_to_link, direction):
17        # links the provided room, in the provided direction
18        self.linked_rooms[direction.lower()] = room_to_link
Then open the main.py and add the code highlighted below:
 1# main.py
 2
 3from room import Room
 4
 5# create rooms
 6cavern = Room("Cavern")
 7cavern.description = "A room so big that the light of your torch doesn’t reach the walls."
 8
 9armoury = Room("Armoury")
10armoury.description = "The walls are lined with racks that once held weapons and armour."
11
12lab = Room("Laboratory")
13lab.description = "A strange odour hangs in a room filled with unknownable contraptions."
14
15# link rooms
16cavern.link_rooms(armoury,"south")
17armoury.link_rooms(cavern,"north")
18armoury.link_rooms(lab,"east")
19lab.link_rooms(armoury,"west")
20
21# describe the rooms
22cavern.describe()
23armoury.describe()
24lab.describe()
Predict in detail what you think the program will do, then run the program.
Did you predict that nothing would change? We’ll fix that later. In the meanwhile, let’s investigate the new code line-by-line.
First the code in room.py:
Code Explanation
self.linked_rooms = {}→ this line creates thelinked_roomsattribute.def link_rooms(self, room_to_link, direction):→ this defines thelink_roomsmethod. It takes three arguments:self→ means “this room”.room_to_link→ the room you want to connect to.direction→ north, south, east, or west.
# links the provided room, in the provided direction→ a comment explaining what the method does.self.linked_rooms[direction.lower()] = room_to_link→ this adds the connection to the dictionary.direction.lower()→ turns the direction into lowercase.self.linked_rooms[direction.lower()]finds the correct spot in the dictionary.= room_to_link→ stores the room in that direction.If the direction wasn’t there yet, it creates it.
If it was already there, it replaces the old value.
Then in main.py:
Code Explanation
# link rooms→ code structuring commentcavern.link_rooms(armoury,"south")→ links thecavernand thearmouryto the"south"of it.armoury.link_rooms(cavern,"north")→ links thearmouryand thecavernto the"north"of it.armoury.link_rooms(lab,"east")→ links thearmouryand thelabto the"east"of it.lab.link_rooms(armoury,"west")→ links thelaband thearmouryto the"west"of it.
Notice that each connection needs two calls to the link_rooms method.
Include linked Rooms in description
When you ran the code, nothing looked different, but the rooms were actually linked together. We just weren’t showing those links on the screen. Now we’ll fix that by adding the connected rooms to the room’s description.
Go to your room.py file and include the highlighted code below.
 1# room.py
 2
 3class Room():
 4
 5    def __init__(self,room_name):
 6        # initialises the room object
 7        self.name = room_name.lower()
 8        self.description = None
 9        self.linked_rooms = {}
10
11    def describe(self):
12        # displays a description of the room in the UI
13        print(f"\nYou are in the {self.name}")
14        print(self.description)
15        for direction in self.linked_rooms:
16            print(f"To the {direction} is the {self.linked_rooms[direction].name}")
17
18    def link_rooms(self, room_to_link, direction):
19        # links the provided room, in the provided direction
20        self.linked_rooms[direction.lower()] = room_to_link
Predict in detail what you think the program will do, then run the program.
Let’s investigate the new code line-by-line.
Code Explanation
for direction in self.linked_rooms:→ this loop goes through every entry in thelinked_roomsdictionary.Dictionaries can be used in a
forloop, just like lists.Here,
directionwill be each key in the dictionary, like"north","south","east", or"west".
print(f"To the {direction} is the {self.linked_rooms[direction].name}")→ this line prints a sentence showing which room is in that direction.directionis the current direction (for example,"north").self.linked_rooms[direction].namegets the name of the room linked in that direction.
Stage 1 task
During this lesson we have only been focusing on the first four stages of the PRIMM model. Now it is time for your to implement the Make phase.
Make
Taking the knowledge your have gained through this lesson, you need to:
create one, or more additional rooms
link those additional rooms to one or more of your other rooms.