Hub Inputs

Pybrick Documentation

To explore all Pybricks’ features check the Pybricks documentaion. This can also be seen in the right-hand panel of the Pybricks IDE.

The Prime Hub has two features that can provide input to the robot

  • buttons

  • inertial measurement unit (IMU)
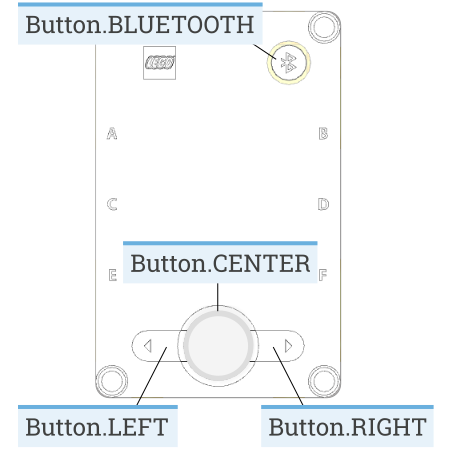
Buttons

The Prime Hub has four buttons, as shown below.

Hub Buttons

Buttons Functions

Pybricks has only one function to detect the pressing of a button:

  • buttons.pressed()→ Collection[Button] → Checks which buttons are currently pressed.

    • returns a tuple of buttons currently being pressed.

    • button values are:

      • Button.LEFT

      • Button.RIGHT

      • Button.CENTER

      • Button.BLUETOOTH

Buttons Example

Now explore how this functions works.

  1. Create a new file called buttons.py

  2. Type the code below into the file

  3. Predict what you think will happen.

  4. Run your code

 1# buttons.py
 2
 3from pybricks.hubs import PrimeHub
 4from pybricks.pupdevices import Motor, ColorSensor, UltrasonicSensor, ForceSensor
 5from pybricks.parameters import Button, Color, Direction, Port, Side, Stop, Icon
 6from pybricks.robotics import DriveBase
 7from pybricks.tools import wait, StopWatch
 8
 9# --- SETUP
10hub = PrimeHub()
11
12
13# --- MAIN LOOP
14while True:
15    pressed = hub.buttons.pressed()
16    
17    if Button.LEFT in pressed:
18        hub.display.icon(Icon.ARROW_LEFT)
19    elif Button.RIGHT in pressed:
20        hub.display.icon(Icon.ARROW_RIGHT)
21    elif Button.CENTER in pressed:
22        hub.display.icon(Icon.CIRCLE)
23    elif Button.BLUETOOTH in pressed:
24        hub.display.char("B")
25    else:
26        hub.display.off()

Investigate

  • lines 3 - 7 → imports all the Pybricks command for use with your robot

  • line 10 → initialised the hub

  • line 14 → creates an infinite loop

  • line 15 → checks to see what buttons are currently being pressed and saves the to pressed

  • line 17 → checks to see if Button.LEFT is one of the buttons being pressed

  • line 18 → displays a left arrow on the light matrix

  • line 19 → checks to see if Button.RIGHT is one of the buttons being pressed

  • line 20 → displays a right arrow on the light matrix

  • line 21 → checks to see if Button.CENTER is one of the buttons being pressed

  • line 22 → displays a circle on the light matrix

  • line 21 → checks to see if Button.BLUETOOTH is one of the buttons being pressed

  • line 22 → displays a B on the light matrix

  • line 26 → turns the display off.

Modify

  • make the light matrix display a down arrow if both Button.LEFT and Button.RIGHT are being pressed

IMU

The IMU is a sensor that can detect how the robot is moving. The sensor is configured around the x-axis, y-axis and z-axis as indicated in the image below.

hub axes

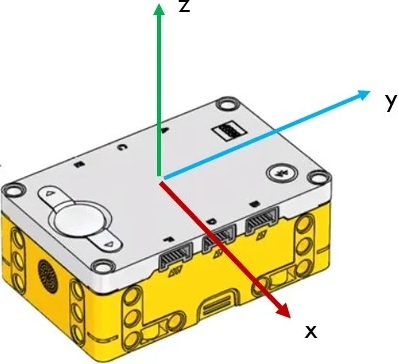
Rotation along each axis has a specific name:

  • Roll is rotation along the x-axis

  • Pitch is rotation along the y-axis

  • Yaw is rotation along the z-axis, but it is not yet implemented.

IMU Orientation Functions

Pybricks offers two functions that informs the hub’s orientation:

  • imu.up()→ Side → Checks which side of the hub currently faces upward.

    • side values are:

      • Side.TOP

      • Side.BOTTOM

      • Side.LEFT

      • Side.RIGHT

      • Side.FRONT

      • Side.BACK.

  • imu.tilt()→ Tuple[int, int] → Returns the pitch and roll angles in a tuple (pitch, roll)

IMU Orientation Example

Use the code below to explore how these functions works.

  1. Create a new file called imu_orientation.py

  2. Type the code below into the file

  3. Predict what you think will happen.

  4. Run your code

 1# imu_orientation
 2
 3from pybricks.hubs import PrimeHub
 4from pybricks.pupdevices import Motor, ColorSensor, UltrasonicSensor, ForceSensor
 5from pybricks.parameters import Button, Color, Direction, Port, Side, Stop
 6from pybricks.robotics import DriveBase
 7from pybricks.tools import wait, StopWatch
 8
 9# --- SETUP
10hub = PrimeHub()
11
12# --- MAIN LOOP
13while True:
14    up  = hub.imu.up()
15    pitch, roll = hub.imu.tilt()
16
17    print(up, "\t", pitch, "\t", roll)

Investigate

  • lines 3 - 7 → imports all the Pybricks command for use with your robot

  • line 10 → initialised the hub

  • line 13 → creates an infinite loop

  • line 14 → gets which side of the hub is facing up and stores it in up

  • line 15 → gets the tuple containing the tilt values, stores the first tuple value in pitch and the second tuple value in roll

  • line 17 → prints the values of up, pitch and roll to the Pybricks terminal

Modify

  • what is the highest and lowest roll value you can get?

  • what is the highest and lowest pitch value you can get?

  • what happens if you remove both "\t", from line 17?