Setup

In this course you will use three technologies that work together:
LEGO Spike Prime: the robot hardware
Pybricks: the software that runs on the robot and the IDE you use to program it
Python: the programming language you will write
Pybricks
We have replaced the standard LEGO Spike firmware with Pybricks firmware because it runs Python better. The trade-off is that you can no longer use the LEGO Spike App to program the robot.
Firmware
Firmware is like a robot’s brain — special software built into the device that makes it work correctly every time you turn it on.
Pybricks IDE
The Pybricks IDE is where you will write and run your programs. You can use it in a browser or install it as an app — either works fine.
If this is your first visit, take the Welcome Tour when prompted. If it doesn’t appear, click the link in the left-hand menu.
Connect Robot
Press and hold the power button on the hub (the big centre button)
The hub should light up nine squares and the power button should flash blue
Click the Bluetooth button in the Pybricks IDE
Choose your robot’s name from the pop-up list (the name is on the front of the robot)
Click Pair
The power button should turn solid blue — you’re connected!
Check Configuration
Your robot has three sensors and two motors connected to specific ports. The code you are about to run will confirm everything is plugged into the right place.
Device |
Port |
Purpose |
Image |
|---|---|---|---|
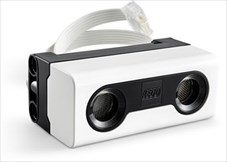
Ultrasonic Sensor |
C |
Detect the distance to object in front |
|
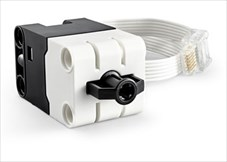
Force Sensor |
B |
Detect the amount of pressure applied |
|
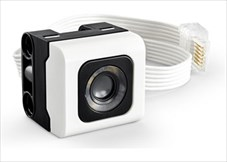
Colour Sensor |
D |
Detect the colour of an object, or the amount of light reflected |
|
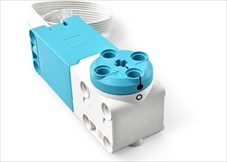
Motor |
E F |
Turns in response to commands from hub |
|
Run the check
In the Pybricks IDE, click Create a new file and choose the Prime Hub icon
Name the file
check_config.pyCopy and paste the code below
Click the Run button (the green play button)
 1from pybricks.hubs import PrimeHub
 2from pybricks.pupdevices import Motor, ColorSensor, UltrasonicSensor, ForceSensor
 3from pybricks.parameters import Button, Color, Direction, Port, Side, Stop
 4from pybricks.robotics import DriveBase
 5from pybricks.tools import wait, StopWatch
 6from pybricks.iodevices import PUPDevice
 7
 8# --- SETUP
 9# start components
10left_motor = Motor(Port.E, Direction.COUNTERCLOCKWISE)
11right_motor = Motor(Port.F, Direction.CLOCKWISE)
12drive_base = DriveBase(left_motor, right_motor, wheel_diameter=57, axle_track=80)
13
14# store variables
15device_names = {
16    48: "SPIKE Medium Angular Motor",
17    49: "SPIKE Large Angular Motor",
18    61: "SPIKE Color Sensor",
19    62: "SPIKE Ultrasonic Sensor",
20    63: "SPIKE Force Sensor"
21    }
22
23ports = [Port.B, Port.C, Port.D, Port.E, Port.F]
24
25# --- RUNNING
26# checking components in hubs
27print("Hub configuration")
28
29for port in ports:
30    device = PUPDevice(port)
31    print(port, ": ", device_names[device.info()["id"]])
32
33# checking motors in correct ports
34drive_base.turn(360)
35drive_base.straight(100)
Checking the ports devices
Don’t worry about understanding the code, you will learn that through these tutorials.
What you need to check is the output in the terminal (the panel at the bottom of the IDE). It should be the same as below:
Hub configuration
Port.E :  SPIKE Medium Angular Motor
Port.F :  SPIKE Medium Angular Motor
Port.C :  SPIKE Ultrasonic Sensor
Port.D :  SPIKE Color Sensor
Port.B :  SPIKE Force Sensor
If anything is different, unplug and move the cables until each device is in its correct port.
Checking the motors
The robot should turn 360° clockwise. If it turns counter-clockwise, swap the cables in Port E and Port F.
left motor → Port E
right motor → Port F
Start Exploring
You’re all set up! Keep these tips in mind as you work through the tutorials:
Type the code — it’s tempting to copy and paste, but typing helps it stick.
Use PRIMM — predict what the code will do before you run it, then investigate and modify it.
Read the callout boxes — they explain key concepts and coding practices.
Remix and build — treat the code like LEGO. Break it apart, mash pieces together, and make something new.
PRIMM
Throughout this course we use the PRIMM process: Predict, Run, Investigate, Modify, Make.
Predict: What do you think the code will do before you run it?
Run: Run it and compare to your prediction.
Investigate: Go through the code line by line — what does each part do?
Modify: Change something and see what happens.
Make: Use what you’ve learned to build something new.