Hub Outputs
Pybrick Documentation
All Pybricks commands are listed in the Pybricks documentation. You can also find it in the right-hand panel of the Pybricks IDE.
The Spike Prime Hub has three ways to produce output:
Hub status light
Light matrix
Speaker
Output and Input
Think of a robot exploring a room on its own.
When it uses sensors to detect a wall ahead — that’s input. The robot is collecting information.
When it turns left to avoid the wall — that’s output. The robot is acting on that information.
Input = gathering information. Output = doing something with it.
The Hub Status Light
The status light sits around the power button. By default it is turned off.

Status Light Functions
Function |
What it does |
|---|---|
Turns the light on at a chosen colour |
|
Turns the light off |
|
Blinks the light on and off at set time intervals |
|
Cycles through a list of colours, one at a time |
Status Light Example
Create a new file called
hub_light.pyType the code below into the file
Predict what you think will happen
Run your code
 1from pybricks.hubs import PrimeHub
 2from pybricks.pupdevices import Motor, ColorSensor, UltrasonicSensor, ForceSensor
 3from pybricks.parameters import Button, Color, Direction, Port, Side, Stop
 4from pybricks.robotics import DriveBase
 5from pybricks.tools import wait, StopWatch
 6
 7# --- SETUP
 8# start components
 9hub = PrimeHub()
10
11# store variables
12
13# --- RUNNING
14while True:
15    # read sensor data
16
17    # process data
18
19    # output data
20    hub.light.on(Color.MAGENTA)
21    wait(1000)
22    hub.light.blink(Color.RED, [500,250,500,250])
23    wait(1500)
24    hub.light.animate([Color.GREEN, Color.WHITE, Color.ORANGE],1000)
25    wait(3000)
26    hub.light.off()
27    wait(1000)
Investigate
lines 3–7 → imports all Pybricks commands for your robot
lines 9–10 → creates a PrimeHub object and names it
hubline 14 → starts an endless loop
line 15 → sets the status light to
MAGENTAsee the colour documentation for all available colours
line 16 → waits 1000 milliseconds (1 second)
line 17 → blinks
RED: on 500ms → off 250ms → on 500ms → off 250msline 18 → waits 1500 milliseconds
line 19 → animates through
GREEN,WHITE, thenORANGE, each showing for 1000msline 20 → waits 3000 milliseconds
line 21 → turns the light off
line 22 → waits 1000 milliseconds
Modify
Can you display different colours?
Can you change the timing of the blink?
Can you change the timing of the animation?
What happens if you put a
#in front of all thewaitlines to comment them out?
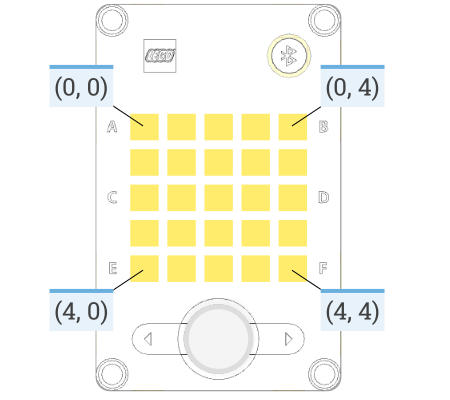
Light Matrix
The hub has a 5×5 grid of lights called the light matrix. You can display text, icons, or control individual pixels using their row and column coordinates.
Light Matrix Functions
Function |
What it does |
|---|---|
Sets which side of the hub is considered “up” |
|
Turns off all pixels |
|
Turns on a single pixel at a set brightness |
|
Displays a built-in icon — see the full icon list |
|
Plays an animation using a list of icons |
|
Displays a number from −99 to 99 |
|
Displays a single character or symbol |
|
Scrolls a text string, one character at a time |
Light Matrix Example
Create a new file called
light_matrix.pyType the code below into the file
Predict what you think will happen
Run your code
 1from pybricks.hubs import PrimeHub
 2from pybricks.pupdevices import Motor, ColorSensor, UltrasonicSensor, ForceSensor
 3from pybricks.parameters import Button, Color, Direction, Port, Side, Stop, Icon
 4from pybricks.robotics import DriveBase
 5from pybricks.tools import wait, StopWatch
 6
 7# --- SETUP
 8# start components
 9hub = PrimeHub()
10
11# store variables
12
13# --- RUNNING
14while True:
15    # read sensor data
16
17    # process data
18
19    # output data
20    hub.display.orientation(Side.RIGHT)
21    hub.display.icon(Icon.UP)
22    wait(250)
23    hub.display.orientation(Side.BOTTOM)
24    hub.display.icon(Icon.UP)
25    wait(250)
26    hub.display.orientation(Side.LEFT)
27    hub.display.icon(Icon.UP)
28    wait(250)
29    hub.display.orientation(Side.TOP)
30    hub.display.icon(Icon.UP)
31    wait(250)
32
33    hub.display.off()
34    wait(500)
35
36    hub.display.pixel(1,1,100)
37    hub.display.pixel(1,3,100)
38    hub.display.pixel(3,1,100)
39    hub.display.pixel(3,2,100)
40    hub.display.pixel(3,3,100)
41    wait(1000)
42
43    hub.display.off()
44    wait(500)
45
46    arrows = [Icon.RIGHT, Icon.DOWN, Icon.LEFT, Icon.UP]
47    hub.display.animate(arrows, 500)
48    wait(1000)
49
50    hub.display.off()
51    wait(500)
52
53    hub.display.char("R")
54    wait(500)
55    hub.display.number(2)
56    wait(500)
57    hub.display.char("D")
58    wait(500)
59    hub.display.number(2)
60    wait(500)
61
62    hub.display.off()
63    wait(1000)
64
65    hub.display.text("C3PO", 500, 50)
66
67    hub.display.off()
68    wait(2000)
Investigate
lines 3–7 → imports all Pybricks commands — make sure
Iconis included at the end of line 5lines 9–10 → creates a PrimeHub object and names it
hubline 15 → starts an endless loop
lines 16–27 → rotates the display orientation and shows an up arrow for each direction
lines 29–30 → turns the display off for 1 second
lines 32–37 → lights up individual pixels to draw a “meh” face
lines 38–40 → turns the display off for 1 second
line 42 → creates a list of icons
line 43 → animates through each icon in the list, showing each for 500ms
line 44 → waits 1 second
lines 46–47 → turns the display off for 1 second
lines 49–56 → displays numbers and characters one at a time
lines 58–59 → turns the display off for 1 second
line 61 → scrolls the text
C3POacross the displaylines 63–64 → turns the display off for 2 seconds
Modify
Can you make
Icon.HAPPYspin around all four display orientations?Can you redesign the “meh” face so the mouth fills the whole bottom row and the eyes are 2×2 pixels?
What happens if you comment out all the
waitlines?
Speaker
The hub has a built-in speaker for playing tones and music.
Speaker Functions
Function |
What it does |
|---|---|
Sets the volume level. If no value is given, returns the current volume |
|
Plays a single beep at a given pitch and length |
|
Plays a sequence of musical notes at a set tempo |
Speaker Example
Create a new file called
speaking.pyType the code below into the file
Predict what you think will happen
Run your code
 1from pybricks.hubs import PrimeHub
 2from pybricks.pupdevices import Motor, ColorSensor, UltrasonicSensor, ForceSensor
 3from pybricks.parameters import Button, Color, Direction, Port, Side, Stop
 4from pybricks.robotics import DriveBase
 5from pybricks.tools import wait, StopWatch
 6
 7# --- SETUP
 8# start components
 9hub = PrimeHub()
10
11# store variables
12
13# --- RUNNING
14while True:
15    # read sensor data
16
17    # process data
18
19    # output data
20    hub.speaker.volume(100)
21    current_volume = str(hub.speaker.volume())
22    hub.display.text(current_volume)
23    hub.speaker.beep(440,500)
24
25    hub.speaker.volume(50)
26    current_volume = str(hub.speaker.volume())
27    hub.display.text(current_volume)
28    hub.speaker.beep(440,500)
29
30    oh_when_the_saints = [
31        "C4/4", "E4/4", "F4/4", "G4/1",
32        "C4/4", "E4/4", "F4/4", "G4/1",
33        "C4/4", "E4/4", "F4/4", "G4/2",
34        "E4/2", "C4/2", "E4/2", "D4/1",
35        "E4/4", "E4/4", "D4/4", "C4/2",
36        "C4/2", "E4/2", "G4/4", "G4/4", "G4/4", "F4/1",
37        "E4/4", "F4/4", "G4/2", "E4/2", "C4/2", "D4/2", "C4/1"
38    ]
39
40    hub.speaker.play_notes(oh_when_the_saints,180)
Investigate
lines 3–7 → imports all Pybricks commands for your robot
lines 9–10 → creates a PrimeHub object and names it
hubline 15 → starts an endless loop
line 17 → sets the volume to 100%
lines 18–19 → reads the current volume and displays it on the light matrix
line 20 → plays a 440Hz beep for 500ms
line 22 → sets the volume to 50%
lines 23–24 → reads the current volume and displays it on the light matrix
line 25 → plays a 440Hz beep for 500ms
lines 27–35 → stores the notes for Oh When the Saints in a list
line 37 → plays the notes at 180 BPM
Modify
What is the lowest volume you can still hear?
What is the lowest pitch beep you can hear?
What is the highest pitch beep you can hear?
Can you program the hub to play a different tune?