Learning Goals
By the end of this section you will:
installed all necessary software onto your computer
configured computer as required for our course
The following technologies are used throughout this text.
Python Programming Language
We will be using Python as our programming language for this course. Specifically we will be using Python 3.13 or later (3.1X).
I already have Python
You may already have Python installed on your computer. This may be from a previous course, or macOS sometimes comes packaged with Python 2.7 (don’t not use this or remove it, it is part of your operating system).
Irrespective, is it best that you install and use the latest version of Python. This will provide you with access to all the features described in this course and ensure that you are using the fastest and most secure version of the language.
You can have more than one version on Python on you computer, so follow the instructions below to ensure you have the latest version.
Windows users
Windows users can install Python via the official Python website or via the Microsoft Store.
Microsoft store
The Microsoft Store offers two advantages:
Python will automatically be added to the PATH variable.
Windows will automatically update minor release of Python. For example
it will update 3.12.0 → 3.12.1
it won’t update 3.12.0 → 3.13
To install via the Microsoft Store:
Open the Microsoft Store on Windows
Search for Python 3.12 and select it
Click the Get button in the top right-hand corner
Official website
To install Python go to the downloads section of the Python website and choose the installer for your OS.
Mac Users
To install Python go to the downloads section of the Python website and choose the installer for your OS.
Python Packages
Python comes installed with a range of packages. This is called The Python Standard Library. Although these might seem like a huge number of packages, it is actually a very small selection of packages available. These cover Python’s basic operations, and limiting the install to these packages reduces the size of Python.
To extend the functionality of Python, you need to install additional packages. These packages can be found at the Python Package Index. Some of the packages we will use are:
To install the packages, we will be using Python’s built-in package installer pip.
Integrated Development Environment
Since Python script files are just text files, you can write Python code in Windows Notepad, or TextEdit on macOS, and this might work for small projects. Once your project starts involving several modules, each with hundreds of lines, it starts becoming unwieldy. This is where an IDE (Integrated Development Environment) or a Code Editor are useful.
An IDE (or Integrated Development Environment) is a program dedicated to software development. As the name implies, IDEs integrate several tools specifically designed for software development. These tools usually include:
An editor designed to handle code (with, for example, syntax highlighting and auto-completion)
Build, execution, and debugging tools
Some form of source control
In contrast, a dedicated code editor can be as simple as a text editor with syntax highlighting and code formatting capabilities. Most good code editors can execute code and control a debugger. The very best ones interact with source control systems as well. Compared to an IDE, a good dedicated code editor is usually smaller and quicker, but often less feature rich.
We will be using Visual Studio Code (VS Code) (download from here) which is a code editor, although, we will use a range extensions to expand its capability so that is it equivalent to an IDE.
Importantly, the extended VS Code will allows us to:
Save and reload code files - allows you to save your work and reopen everything later, in the same state it was in when you left.
Run code from within the environment - you can run Python code without having to drop out of the editor.
Debugging support - allow you to step through your code as it runs, displaying variable values etc.
Syntax highlighting - uses font colours to help you quickly spot keywords, variables, and symbols in your code. This makes reading and understanding code much easier.
Automatic code formatting - little things like recognizing the colon at the end of a while or for statement, and indenting the next line, makes life easier.
Extensions
We will be using the below extensions in VS Code to expand it’s capabilities:
Python - provides extra Python functionality
Pylance - provides code completion and error checking
Ruff - Formats your code to comply with recorgnised style guides
SQLite - allows the viewing of SQLite databases
Rainbow CSV - colourfies CSV files to make the easier to read
CSV to Table - converts CSV files into tables
You can also install various icon and colour themes. For this course I will be using the extensions below. You can use whatever you like, but it will look different.
Virtual Environments
The modular nature of Pythons means that different projects will require different packages. Over time this can lead to dependency conflicts and your Python install will become bloated. To prevent this we use virtual environments.
Dependency Conflict
Modules in Python are built using other modules, these are called dependencies. It is not unusual for two different modules share a dependency, but this can present a problem when the two modules require different versions of the shared dependency. Which version of the shared dependency should be installed? This is called a dependency conflict.
At its core, the main purpose of Python virtual environments is to create an isolated version of Python for a specific project. This means that each project can have its own packages, regardless of what packages every other project has. The great thing about this is that there are no limits to the number of environments you can have since they’re just directories containing a different scripts.
requirements.txt
The requirements.txt file lists all the external libraries that we need to install for this project.
You can add extra libraries to this file, but to install them you will need to run the command:
Windows:
pip install -r requirements.txtmacOS:
pip3 install -r requirements.txt
Create Virtual Environment
Windows Users
If you are a Windows user, you might need to run a PowerShell command before you create a virtual environment for the first time.
To do this:
Open PowerShell as Administrator
Type the following:
Set-ExecutionPolicy -ExecutionPolicy RemoteSigned -Scope CurrentUserthen EnterYou shouldn’t need to do this again, unless you get a new computer.
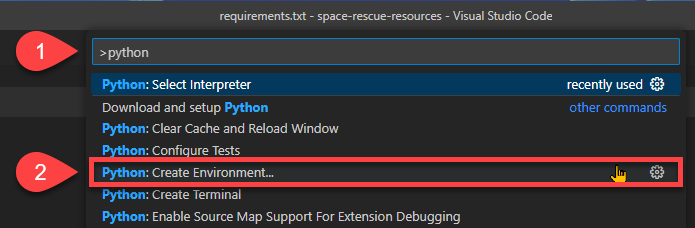
To create a virtual environment for this project:
Press Ctrl/Cmd + Shift + P
Type Python at the top
Choose Python: Create Environment...
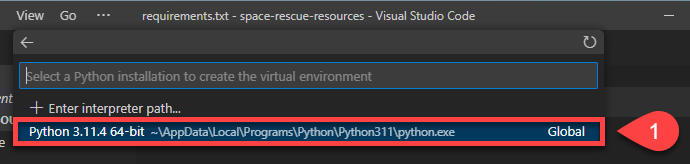
At the top choose the Venv option

Then choose the latest version of Python that you just installed
Tick the box beside requirements.txt and then ok

VS Code will now:
create your virtual environment
perform any necessary updates
install the libraries in the requirements.txt file
activate your virtual environment
Check Virtual Environment
To check that the virtual environment is active, look at the status bar at the bottom left for Python versions and virtual environment name (see below).

Version Control
Version control, also known as source control, is the practice of tracking and managing changes to software code. Version control systems are software tools that help software teams manage changes to source code over time.
Git
Git is a free and open source distributed version control system designed to handle everything from small to very large projects with speed and efficiency. Git is naturally incorporated into VS Code, but you will need to download and install the Git client for it to work properly.
GitHub
GitHub is a provider of internet hosting for software development and version control using Git. It offers the distributed version control and source code management (SCM) functionality of Git, plus its own features. It provides access control and several collaboration features such as bug tracking, feature requests, task management, continuous integration and wikis for every project. It is commonly used to host open-source projects. As of November 2021, GitHub reports having over 73 million developers and more than 200 million repositories (including at least 28 million public repositories).
We will be using GitHub to host your code for this course. If you don’t already have an account, got to GitHub and register. Use your College email to register. You can change the email if you wish to use the account after school to access your code from this course.
To make working with GitHub easier, we will also be using GitHub Desktop which is a GUI interface for working with GitHub. It makes using GitHub significantly easier.
Database Management System
Database Management Systems (DBMS) are software systems used to store, retrieve, and run queries on data. A DBMS serves as an interface between an end-user and a database, allowing users to create, read, update, and delete data in the database.
In Unit 2 we will working with databases using SQL (Structured Query Language), in particular a version caller SQLite. Ultimately in Unit 3 we will designing and developing our own DBMS, but for Unit 2 we will use a lightweight DBMS called DB Browser for SQLite.
Other Tools
Mind Mapping Software
There are many free mind mapping tools available online and for download. They all do the same basic job, so use whatever you like. Here are two suggestions:
Windows Textized MindMap
macOS SimpleMind
Diagrams dot net
Throughout the course you will need to create a range of diagrams. To do this we will use diagrams dot net. You can use the online version, or you can download the desktop version. I personally use the desktop version to save my diagrams straight to my project folders.
Figma
We will be using Figma to create wireframes, mock-ups, prototypes, and application interface flowcharts. To access Figma got to the website. Check with your teacher for your account details.
Qt Designer
Qt Designer is a tool for quickly building graphical user interfaces with widgets from the Qt GUI framework. It gives you a simple drag-and-drop interface for laying out components such as buttons, text fields, combo boxes and more. We will be using it throughout the course.